Sailboat Winterization
I admit, we cheated, we had most of this taken care of by Wiggers. There’s some additional info you may want to research if you are doing more of this yourself. Most important comment from previous owner was to be careful when demasting. The CS34 mast is top heavy so you want to place the sling higher up to prevent it from flopping over when you try and lift it.
Other things to consider is properly setting up the cradle so that most of the weight is on the cradle. We saw other boats (not at Wiggers) that had inward bulges on their hulls where the cradle pads were way too tight.
Feel free to add your opinions / tips / suggestions in the comments. I will keep updating this page as I learn more.
Engine
Tools needed:
- Wrench for transmission bolt
- Oil pump with hose small enough for dipstick hole
- Engine oil disposal container
- Bucket larger than 2 gallons
- Rags
- Degreaser
- Bilge pad for under engine
- Garbage bags
- Tape
- Rubber gloves
- Empty ketchup bottom (for transmission fluid)
- Funnel (for engine oil)
Supplies needed:
- Universal Oil Filter – 300209
- Automatic Transmission Fluid (ATF) Type A or DEXRON II (GM) or M2 C33G (Ford) transmission oil. 0.55 Litres
- Diesel engine oil 10W40. 4 US quarts / 3.79 Litres.
- Antifreeze coolant > 2 gallons.
- Diesel fuel to top up tank.
- Diesel bioguard additive.
Lubrication system
Do this before haul out, it requires the engine to be at operating temperature before draining oil.
- Ensure engine is at operating temperature.
- Stop engine and remove existing oil through the dipstick oil using a hand pump with a hose small enough to fit in the dipstick oil hole.
- Remove oil filter with an oil filter wrench. Or I’ve heard some people punch a hole through the side with a screwdriver, but I think this will create too much of a mess and I would be worried about damaging the threads on the engine block.
- Screw on new oil filter. Before attaching new oil filter, clean up the contact point on the engine to help reduce chance of leaks. Some people fill oil filter with oil prior to attaching. Ensure you put a thin coat of oil on the oil filter gasket before screwing it onto the engine block. Hand tighten, don’t use wrench.
- Refill crankcase with new oil and replace filler cap.
- Check oil level with dipstick.
- Run engine for five minutes and stop.
- Check oil level again with dipstick.
Transmission
Fill transmission to top with transmission fluid to reduce chance of water condensation and rust forming inside transmission.
- At rear of engine remove the transmission fluid bolt.
- Optional: remove the drain bolt from bottom of transmission and remove all existing transmission fluid. Replace drain bolt.
- Fill with transmission fluid, almost to the top.
- Replace transmission fluid bolt.
Sea Water Cooling System
Haven’t done this yet. This section just has info I’ve found and a bunch of questions. Most of this from the Universal M4-30 Operator Manual. Also showing steps for “wet storage”. The manual also provides separate steps for “dry storage”. Refer to manual if you are interested in this.
- Disconnect hose end at sea water pump that comes from heat exchange to drain the sea water system. Lower the free end of hose to a point approximately level with the front engine mount. This will allow the sea water to drain.
- Loosen the 4 or 6 screws on the sea water pump cover plate. Tap the plate lightly to loosen it, this will allow the pump to drain.
- Drain exhaust muffler and system separately.
- Disconnect sea water inlet hose at sea cock shut off valve. Ensure seacock is closed first.
- After inlet hose has stopped draining, place hose into a container (approx 2 gallons) of antifreeze. Start engine and run the antifreeze through the system until the antifreeze comes out the exhaust outlet. Stop engine. Make sure you do not run out of antifreeze while the engine is running.
I’m still confused on how to deal with the muffler. There are additional instructions: If aqua-lift or pot type muffler is used, it is recommended to drain prior to pumping antifreeze through the system. And again afterwards to prevent coolant from backing up into the engine. Also suggests after allowing the muffler to dry, cover the opening to prevent further moisture from entering.
Also need to deal with water impeller on front of engine. We replaced at this time. However CS36T owner’s manual suggests doing this in spring. And also suggests lubricating with teflon grease.
Also worried about diesel filter, doesn’t that potentially have water in it? There is also a second filter near the rear of the engine that I have no idea what it is for.
Fuel system
To protect against corrosion or moisture in the fuel tank. Fill the tank with diesel and add an anti bacterial additive to the fuel to prevent bacterial growth.
Water and holding systems
This step requires power for the pressure system. Need to do this before electrical.
Supplies:
- Propylene-glycole based non-toxic antifreeze.
- Holding tank deoderizer.
- Baking soda (x2) with glass containers
Head and holding tank
- Pump holding tank
- Add deoderizing cleaner, flush with fresh water, then pump again.
- Add 2-4 quarts of ethylene glycol antifreeze to the toilet and pump through the system into the tank.
- Water heater drain hose
Fresh water system
I relied on Wiggers to do this for us this year. These are notes I’ve found from various manuals and online.
Fresh water tanks are under the dining area seats on port and starboard, connected by a leveling pipe with a shut-off valve at each tank. Each tank has inspection ports on top.
- In the bilge, disconnect the pipe leading from the T-piece connecting the two tanks.
- Drain almost all water from both tanks.
- Add one gallon of potable antifreeze to each tank. Not 100% sure how to do this. Through inspection port? Or add through fresh water on deck?
- Run “hot” water through both kitchen, bathroom faucet, bathroom shower and stern shower until you see antifreeze.
- Run “cold” water through both kitchen and bathroom faucet, bathroom shower and stern shower until you see antifreeze.
- Pump out all remaining water from the tanks.
- Disconnect all hot and cold water in bilge and allow remaining antifreeze to drain into the bilge.
- Run pump briefly with both cold water taps for a few seconds to drain some of the water.
- Pump the hand pump as well as sea water pump to expel any water.
- Leave all faucets open once system is shut down.
- Open inspection ports in the water tanks and clean out and dry the tanks. Place some baking soda in an open glass container and place in the tank for winter. Close the inspection ports once the tanks are cleaned.
- When entire system is drained, pump out the bilge and sponge clean. Pour a pint of antifreeze into the bilge to prevent an issue if any water/condensation forms in bilge.
- Open seacocks to drain sinks. Pour a small quantity of antifreeze into each sink.
Water heater
The above steps should have flushed the water heater with antifreeze. But it still needs to be drained.
- Ensure 120V AC power to heater is off and water has cooled.
- Locate and open the water heater drain and pressure relief valve.
- Allow all water to drain from the water heater until empty.
- Leave the water heater drain and pressure relief valve open over winter.
On our boat we have a Seaward water heater. The drain has a valve and located at bottom left. The pressure valve has a flip valve and located at top right.
Auxiliary Pumps
I think the only one we need to worry about is the shower sump pump. This should have a little antifreeze added and quickly run.
Seacocks
After all the systems have been winterized, all seacocks should be double checked to ensure they are closed over the winter. At one point they should have been opened and drained.
Electrical
Tools and supplies
- Screwdriver
- Pliers
- Zip ties
- Allen key for NavPod
Batteries
I’ve heard you can charge up and top up the distilled water in the batteries and leave them on the boat but I prefer to remove them.
- Turn off all power.
- Disconnect and remove the three batteries.
I’ve taken copious pictures of the battery connections and where there is more than one wire connecting to a terminal I’ve zipped tied them together to make it easier to attach in the spring.
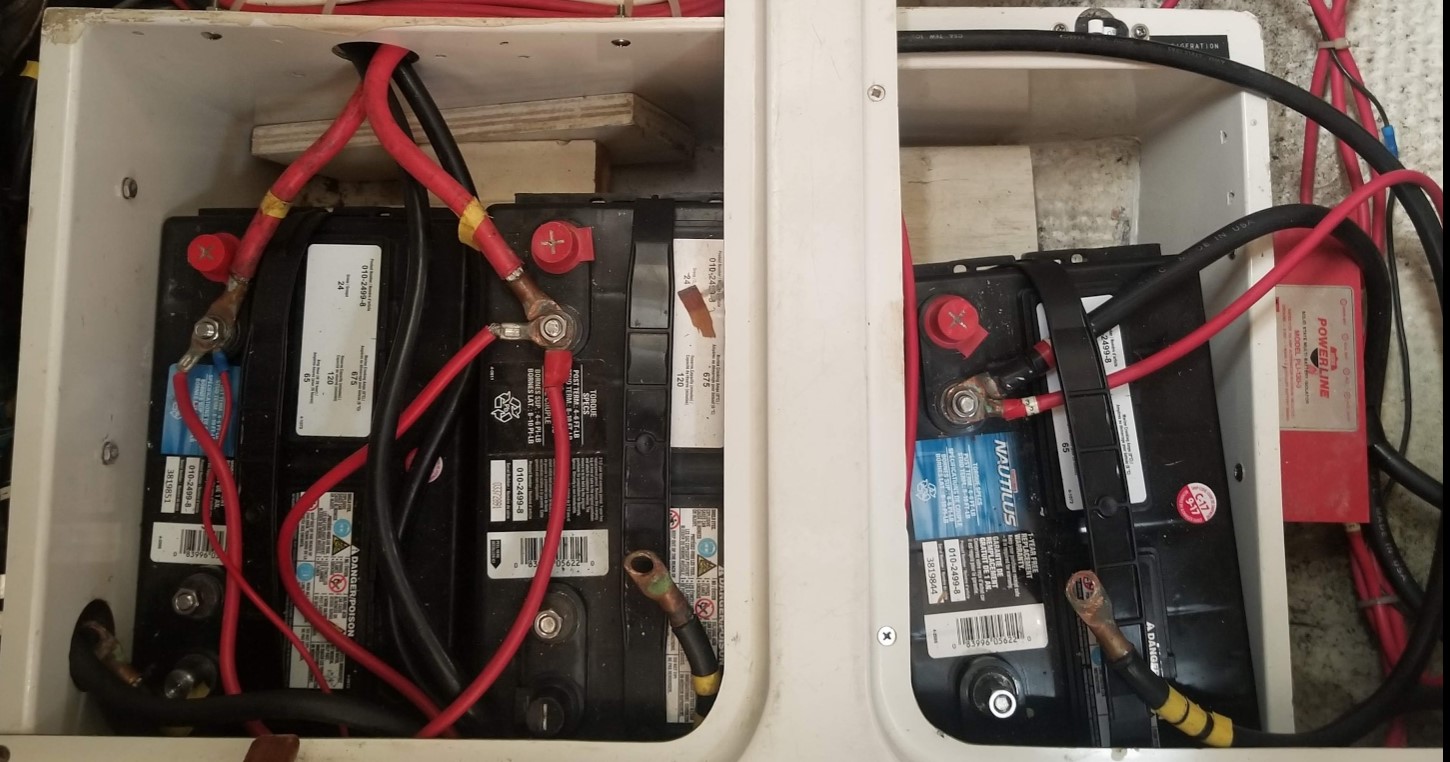
Once the batteries are at home, I check the water levels with a hydrometer and fully charge all three.
Instrumentation
Remove all instrumentation from the cockpit. Requires the special allen key to open up the NavPod.
Consider removing the speed sensor. Not sure if necessary, but it does need to be cleaned before next season.
Exterior hull and deck
Tools and supplies:
- Sandpaper
- Step ladder (or two)
- Protecting spray for metal
- Zip ties
- Pink foam for protecting boat cover
- Boat cover
- Boat cover sandbags
- Extra twine, just in case
- Dehumidifiers
The hull should have already been pressure washed during haul out. A light sand may be all that’s required to remove the remaining bits of sea life stuck to the hull.
All blocks, all running rigging and loose gear should be removed and stored in a dry place.
Lockers and enclosures should be cleaned out and left open so air can circulate. We purchased a few chemical dehumidifiers and left them throughout the boat. Also used Bounce dryer sheets in the past to make the boat smell nice in the spring. Just spread them out randomly throughout the boat. Someone told us they also help keep away rodents but not sure if that’s true.
Consider spraying any remaining gear that will be left on the deck with a protecting spray.
Remove lines and pullies from davits. Consider moving arms down.
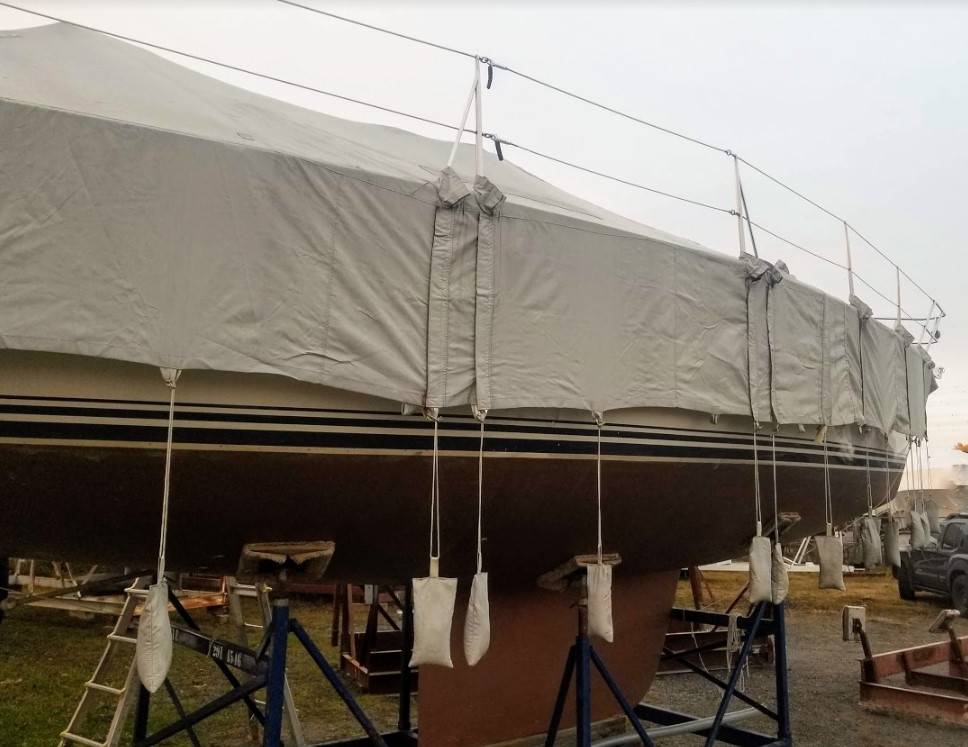
Boat cover
We were fortunate that the previous owner had devised a simple structure that works with the bimini/doger frame to form the backbone for a custom canvas cover for the boat. These are the steps required for this system.
- Fold dodger frame forward and secure with zip ties.
- Fold bimini frame backward and secure with zip ties
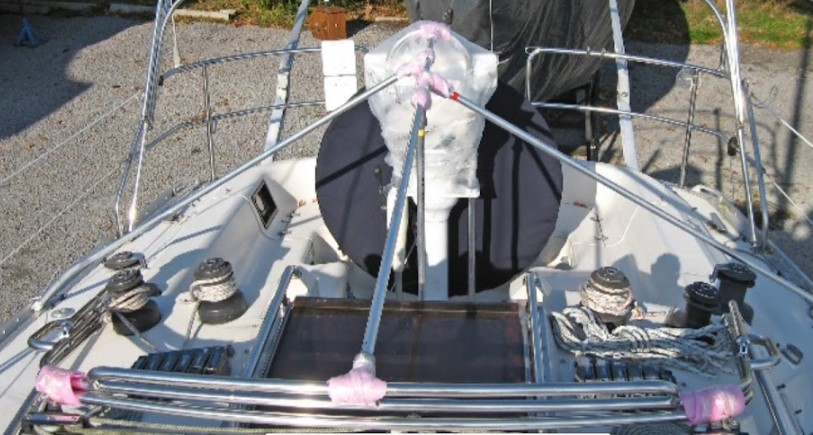
- Starting with pole with clamp on end, clamp to bimini frame then secure to nav pod. Use soft foam to protect frame and nav pod from scratches.
- Use pole the yellow tape to form the vertical support.
- Attach pole with red tape and zip tie to side rail on port side.
- Attach pole with green tape and zip tie to side rail on starboard side.
- Wrap additional foam around any connector with sharp edges to protect the boat cover.
Now you are ready to roll out the sail cover, ours comes in two pieces.
- Attach cover over bow
- Connect second boat cover and attach to stern
- Attach sandbags at every connection on sides
Mast and boom
With the mast and boom removed, now’s a good time to check all of the hardware for damage.
Any lines still on the mast should be placed in a plastic bag and then attached to the mast.
Rolling furler will extend beyond mast and needs to be secured using a pole or a piece of 2×2 to ensure it doesn’t sag.
Use a garbage bag, saran wrap and duct tape to cover any openings to prevent birds from nesting. Consider poking a few holes in bottom to allow any water/condensation to drain.
Leave a Reply