Sailboat spring recommissioning checklist
My checklist of things that need to be done in the spring to get our CS34 sailboat ready for the water.
- Hull
- Electrical
- Fresh water system
- Head
- Engine and drive train
- Steering
- Interior
- Deck equipment
- Mast and Boom
Hull and Deck
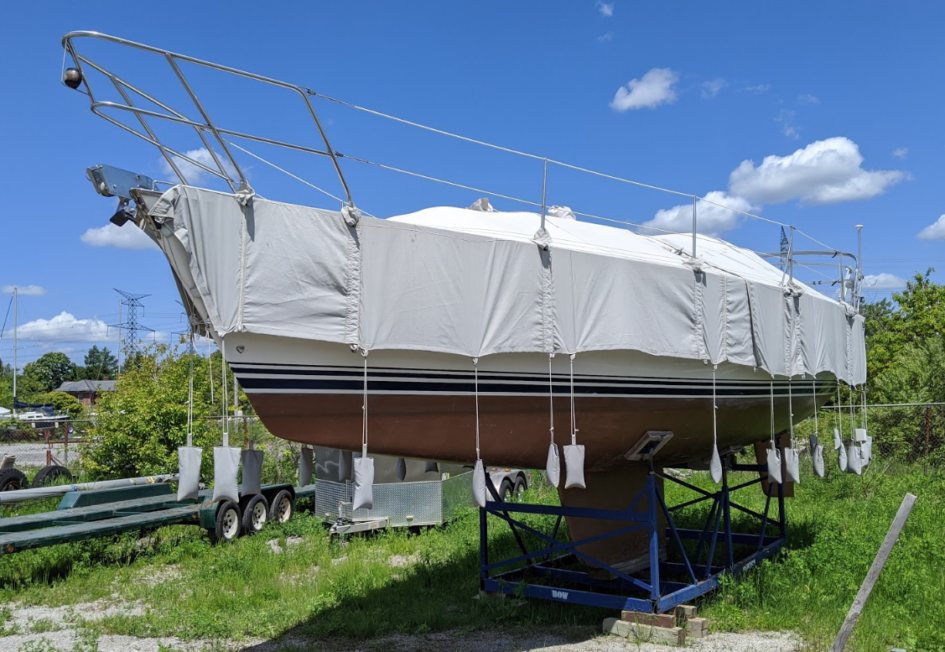
- Remove sandbags and then boat cover.
- Dismantle boat cover frame.
- Reuse foam from frame to close up any holes wasps or birds may decide to build in.
- Check for any damage, cracks, nicks and repair.
- Inspect all sea cocks, thru-hulls exhaust and vents.
- Remove, clean and replace speed sensor (silicone grease o-rings).
- Lightly sand bottom paint with 220 grit sandpaper. Wash and then repaint with Interlux Fiberglass Bottomkote Racing Bronze diluted with Interlux Solvent 216 Special Thinner.
- Clean deck and hull with de-waxer. Wash again with detergent to remove de-waxer.
- Use painter’s tape to protect all rubber/plastic bits to protect during waxing. Wax and buff (consider a polish or buffing compound)
Electrical
- Check charge and water levels in batteries
- Replace batteries and ensure correctly wired. See Install and test batteries.
- Inspect shore power cable, connect to power using adapter to extension cord.
- Turn on 110 circuit breaker on main panel and test battery charger. ENSURE WATER HEATER REMAINS TURNED OFF!
- Check bilge, all interior lights and water pumps.
- Check smoke and carbon monoxide alarms.
Fresh water system
Drain all antifreeze from the system and then fill tanks with a few gallons of fresh water. Test and run the following systems both fresh and hot water (make sure hot water heater is still turned off). Check condition of water and drain pipes at same time.
- kitchen sink taps and drain
- bathroom sink taps and drain
- bathroom shower taps and sump pump
- sugar scoop shower taps
After all water drained from tanks, consider opening inspection ports in both starboard and port water tanks.
Add a few gallons of fresh water again and wait until boat is launched to completely fill tanks.
When you are certain no antifreeze left in fresh water system and hot water tank has been filled, you can now turn on water heater.
Head
- Inspect all pipes and air vent on transom
- Replace joker valve
- Test with fresh water
Consider filling and emptying the head a few times (with fresh water) to ensure it’s working smoothly and no leaks. And if there is a leak, now you are dealing with a cleaner mess.
Engine and drivetrain
- Check cooling system and clean water strainer filter
- Pump out excess transmission fluid, usually fill to top in the fall to prevent corrosion over winter.
- Replace water pump rubber impeller.
- Check belt condition and tension (1/2″ of deflection)
- Check engine mount bolts and rubber pads.
- Check all exhaust hose and clamps
- Check all electrical wiring, terminals, controls and switches. Confirm grounding wire on engine block is secure.
- Check all fuel lines and clamps.
- Check, drain any water or residue in in fuel filters
- Check fuel level and fuel tank inspection port
- Check engine bay blower and vent pipes
After boat is in the water
- Drain oil, replace oil filter and refill oil
- Check freedom of the propeller shaft in the bearings and alignment of the propeller shaft with the engine. Alignment should not be .002″ to 0.004″ out at four points in one position.
- May need to tighten stuffing gland just enough to stop excessive leakage along the shaft.
Steering
- Check all bolts on steering pedestal to ensure nothing is loose
- Move wheel from one full stop to the other to ensure smooth with solid stop at each extreme.
- Check rudder for damage and ensure no wiggle or play in shaft
- Check steering linkage cable and rudder post bell crank under cockpit
- Check emergency tiller operation
Interior
- Check propane locker, check propane locker drain, check propane lines. Load propane tanks and test for pressure drops.
- Check drain in fridge and ice box.
- Clean bilge, remove any water from under sink
- Clean and oil all teak.
- Open and clean all portlights, consider installing bug screens.
- Replace all cushions and bedding.
- Replace all books, paperwork and safety gear.
- Replenish galley
- Replenish head.
Deck equipment
- Replace anchor, chain and rode in bow locker
- Replace 110V shore power line in bow locker
- Replace water hose in bow locker
- Replace bumpers in starboard locker
- Replace dock lines in port locker
- Run lines through davits.
- Replace safety gear on deck, e.g. rings and floating rope.
- Replace flares and safety gear in stern locker.
- Replace life jackets and gear in starboard locker.
Mast and Boom
- Service wind sensor and re-attach to top of mast.
- Check VHF antenna and cable.
- Check anchor light, mast lights and electrical cables.
- Check condition of all shrouds.
- Check all entrances and pulleys (shivs) at top of the mast.
- Check and consider replacing rigging tape on mast and spars.
- Re-run all lines through the mast and wrap securely around base of mast.
- Reattach lazy jack lines and secure to mast.
- Ensure all electrical cables running through mast are bundled and ready to be threaded into cabin.
- Check lines and hardware on boom.
After boat is in the water
- Check tension and setup of all shrouds. Tension should be similar and mast straight. Can further tune later.
- Re-connect electrical wires to mast (see pic below).
- Re-install chartplotter and instruments on the binnacle. Re-connect sea-talk connectors in NavPod to chart plotter and Raymarine displays. Confirm everything working before screwing pod back together.
- Run all lines from mast and furler to cockpit
- Install boom and run all lines to cockpit
- Install vang and run line to cockpit
- Hoist and then fold mainsail on boom
- Setup lazy jack lines
- Hoist and then furl genoa
- Setup dodger cover and straps to hold frame
- Setup bimini cover and straps to hold frame
- Blow up dinghy and lift onto davits. Attach motor to rail.
Extra information

Teak
- Clean with something like Wessex – Teak cleaner and renovator. Gently scrub across the wood grain. Some suggest 3m pad, others Spic n’ Span.
- For rough, damaged teak, it can be lightly sanded after cleaning. Only consider this for solid pieces, not veneered panels. Mask off any adjacent fiberglass to avoid scratches. Don’t sand uncleaned teak.
- Apply teak oil. Saw article saying this lasts 1-3 months. A product called Semco could last 6-8 months.
Leave a Reply