
This year is our electrical year and with continued concerns about availability of shore power we’ve decided now is the time to add marine solar to Foggy. This will be an interesting project since we started with zero knowledge about solar and boat electrical systems. But it’s slowly making sense.
Warning: I’m still learning so this post may have errors that I’m unaware of. Mistakes can be costly and dangerous, please consult a certified ABYC electrician for your own setup.
Our existing system
Here’s a simplified diagram of our existing system. We have two sources of charging for our batteries, shore power and engine alternator.
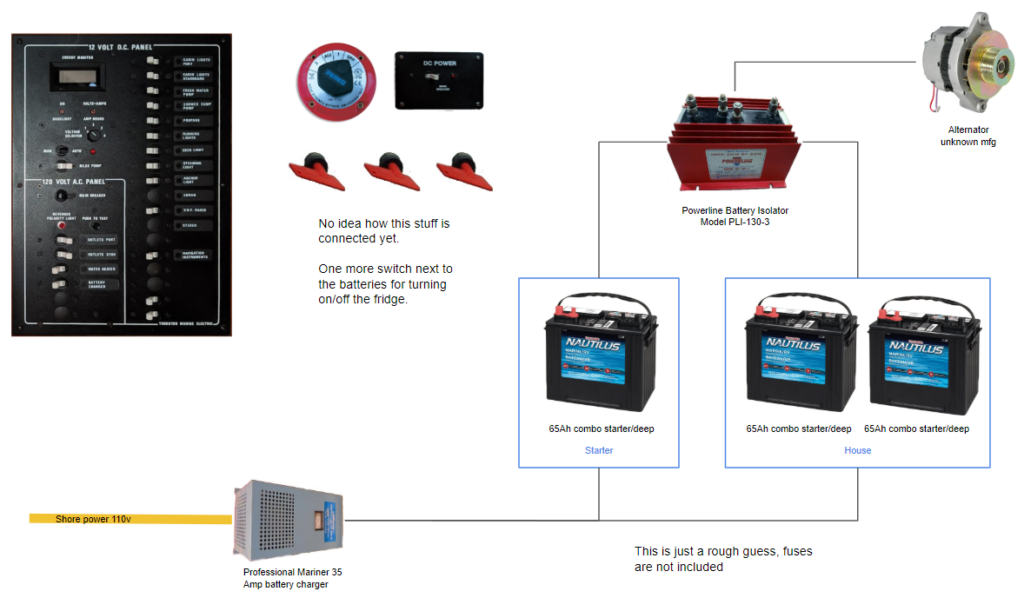
The system works well, with the following concerns:
- our initial inspection revealed that the battery charger should be replaced if we want to expand the life of our batteries
- we can’t run our fridge for any length of time without shore power
- when high water levels cause the power at the marina to be shut down our batteries can only last several days with us living on the boat
Our goal is to be self sufficient and go out for a week without needing to run the engine to recharge the batteries. We’ve also decided to splurge for quality components since we want this system to be dependable and last.
Breaking it down
We decided to split our solar into two phases:
- Phase I – initial installation of single panel and use existing batteries. We will then use the season to further monitor power usage (with better equipment) to determine battery requirements. We want to be able to live on the boat and run the lights and water pumps as well as have our electronics and autopilot running while we are out sailing without fear of draining the batteries. The fridge will still rely on shore power or the engine alternator. Maybe, if we find we are generating surplus power during the day we’ll turn on the fridge for a bit.
- Phase II – upgrade batteries to LiFePO4, change our shore power charger to Victron, consider an inverter for 110V and add automation for battery charging (charging the right battery at the right time). We expect to be free of shore power. Keeping the fridge running at a reasonable temperature all the time.
This project was broken down into three separate components:
- Solar and electronics supplier – who are we going to deal with for purchasing the majority of the equipment? We did the typical online search for suppliers and vendors and it’s tempting to just send your money to one of them to save a few bucks. But we had a great conversation with Pat Tasse from SunTech Enterprises at the Toronto Boat Show and decided to work with them.
- Solar panel mounting solution – who are we going to deal with for mounting the panels onto our davits? Our dinghy davits are manufactured by Atkins & Hoyles, so we started started discussions with them. They offered some options of running 1″ stainless tube at the end of the davits and some options for reinforcing for the added weight.
- Certified ABYC electrician – who are we going to trust to wire this system all together and to ensure that it will be safe and will pass a survey? Still TBD, wanted to have Pat Tasse install but found out he’s over two hours away from the marina and it would add four expensive hours to the cost.
What comes first, the panel or the system
The most common steps to planning out a solar system involve:
- Determine power requirements
- Identify solar panel mounting options and charging solution
- Size your batteries
We tried to follow these steps, but since we are implementing in two phases we are jumping around these steps. In the end the power generation amount came from the available space and the performance of the panel we selected.
Step 1 – Determine power requirements
You will need to perform a power audit of your boat. List out all of the things that suck energy and estimate how much would be used each day. This number will help you decide how much power is needed for your boat. We did that, and here’s the Google Sheet I created listing out all of our systems with power and approximate use.
Sailboat Power Requirements (Google Sheets)
But the answer really is, it depends. My estimates range from 10Ah when we are not around, to a maximum of 270.8Ah. That’s a huge range. For Phase I, all we care about is when we are living on board without the fridge, which could range between 48.6Ah to about 150Ah if we were sailing with all the equipment running for 10 hours. That’s still a huge range.
In the end, I found the power audit was interesting. But the deciding factor on how much solar to add was purely on the space available and the price differences between more efficient vs less efficient panels.
Step 2 – Identify solar panel mounting options and charging solution
Shadows on your panels are bad. Even partial shading on a solar panel can significantly lower the efficiency of your panels. And there’s lots of things on a sailboat that will cause shading, i.e. boom, mast, shrouds, sails, etc.
The sailing vloggers Gone with the Wynns put together a great video demonstrating the effects of shading.
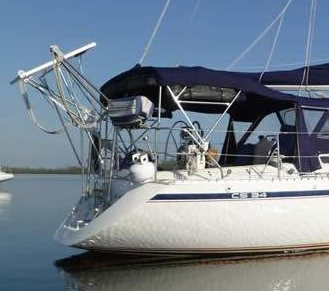
There’s ways to reduce this loss with running multiple panels in parallel or having multiple solar controllers, but it’s best to avoid shadows if you can. For this reason, we decided to mount our panels as far aft as possible. I don’t have this all figured out yet, other than it’s going above our davits here:
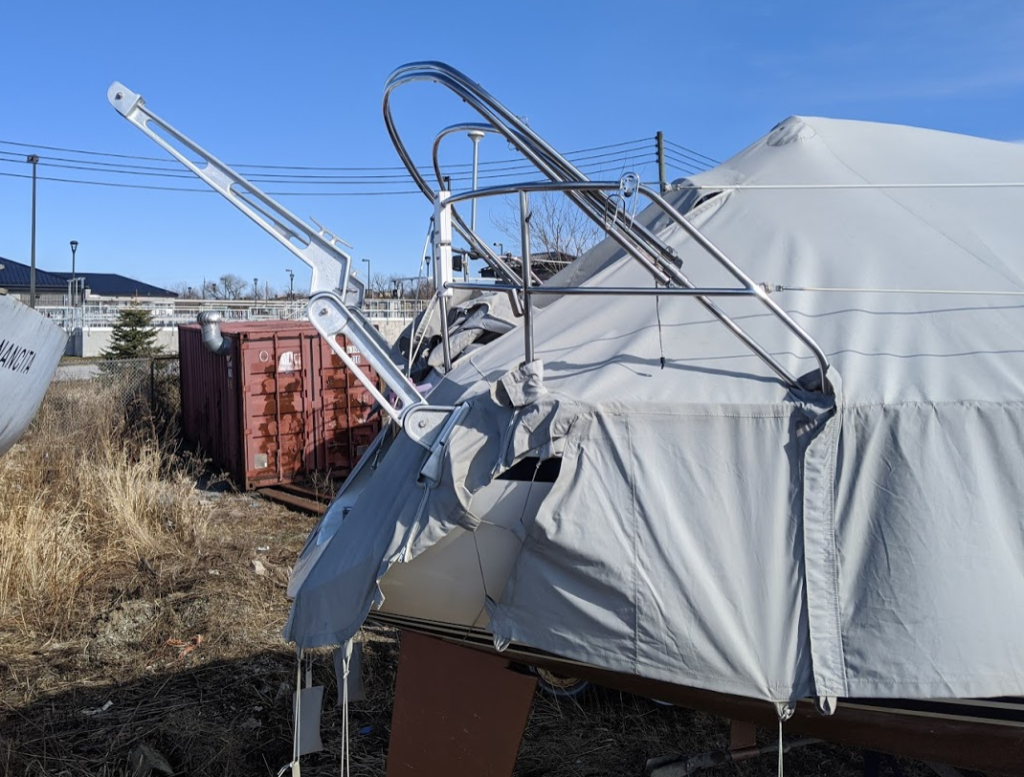
I couldn’t find a better quality picture, but looking to do something similar to this CS34.
Choose a solar panel
The solar panels or photovoltaic panels (PV) we looked at ranged between 200 and 340 Watts for the size we needed. When deciding, you will hear “monocrystalline” and “polycrastalline”. Simple explanation is monocrystalline is more slightly more expensive and more efficient. We ended up going with a monocrystalline 330 Watt panel. With $100s going to a solar charge controller and a power monitoring system, I thought it’s better to invest in a more expensive panel so I’m not kicking myself later. Here’s the panel Pat from Suntech suggested to use based on our request to go solid and mounting position:
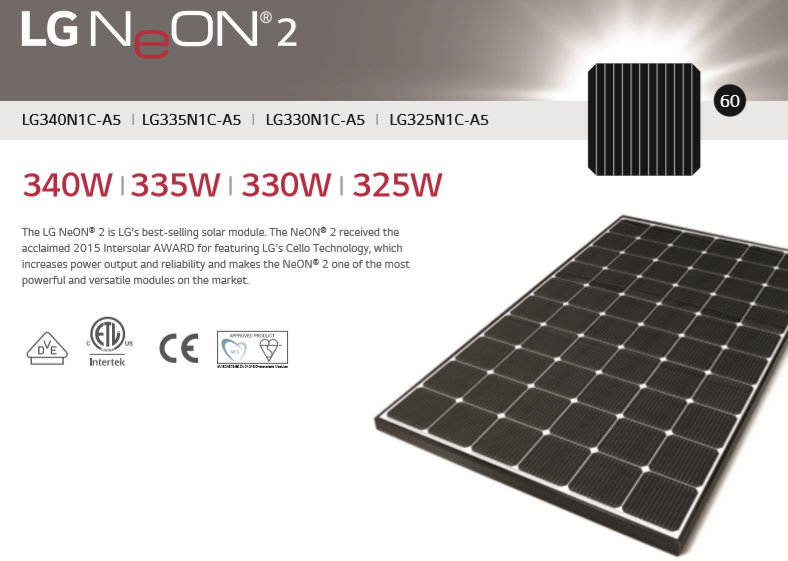
Pat says this panel will generate anywhere from 85Ah-140Ah, but it’s just a guesstimate because factors like hours of sunlight, shading, panel angle, clouds, temperature, dirt, etc. will affect the efficiency.
Once the solar panel is decided you can now work back through the rest of the system to make sure it can handle the output. In our case we need to plan for the future to ensure it can handle two of these panels.
Solar wire and MC4 connectors
Wires running from your panel will be exposed to the elements and we want to be able to disconnect our panels from our boat during winter. These are mostly standardized and come with bulky, but weatherproof MC4 connectors. We needed enough to run from the panel, through the deck on our transom into our boat to the solar charge controller.
Solar charge controller
There are a number of options out there, but the consistent message I hear from various reviewers is to go with Victron if you want a well built system. So Pat suggested the Victron SmartSolar charge controller MPPT 100/30.
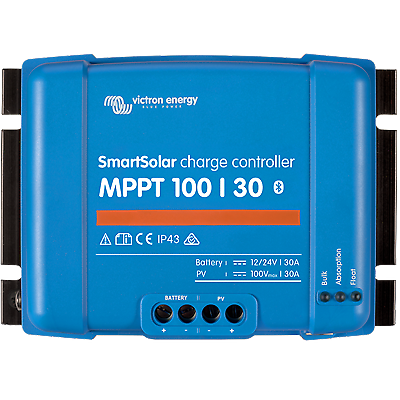
You will hear of two solar controller technologies, Maximum Power Point Tracking (MPPT) and Pulse Width Modulation (PWM). The really short explanation is that PWM is cheaper but not as efficient as MPPT. Some people will argue the extra expense for MPPT isn’t worth it, you can just spend the extra on more or better solar. We wanted to maximize the power coming in from our panels, and I’m a techno geek that likes the fact this offers a Bluetooth connection to configure and see power generation.
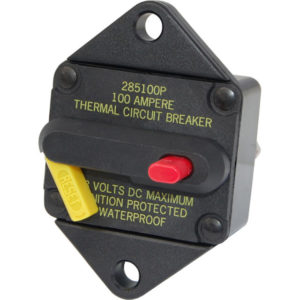
Circuit breaker and fuse
Unlike a battery it’s unlikely you will see a panel create a huge spike of energy that fries your wires, but it requires an inline fuse and method to shut down power to your system from your solar array so we will be using a Blueseas 30A breaker.
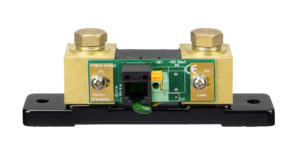
Power monitoring system
This part is optional, but it’s what we needed to help determine our future battery requirements. This will show us what the solar panels are sending to the system, what is being drawn from the batteries and an estimate of available Ah in the batteries. This also can control a relay to turn on/off some systems, we are thinking of using this to turn off the fridge when batteries drop below 70%. All of this info can be displayed and configured via Bluetooth. A future project will be to somehow connect this to our wifi to allow remote monitoring.

This display will be mounted on our breaker panel and requires a new shunt to be installed between our battery bank.
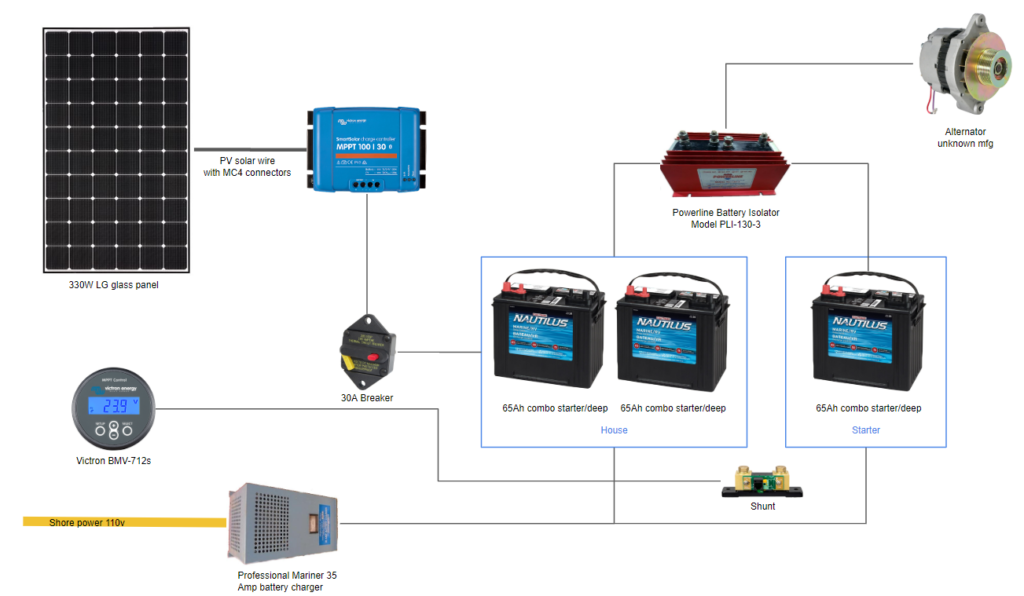
The final solution will look something like this:
Step 3 – Sizing your batteries
You may have noticed I skipped step three. The reasoning behind this is that batteries are crazy expensive and we’re not 100% sure how much power we will need each day. So the plan is to run this system as you see above for a year and keep better track of our power consumption and our solar power generation. Down side is that we will not be able to run our fridge when the sun goes down but we’re ok with that for now.
Not sure what we are going to get for Phase II yet, but I really like the reviews and stories around Battleborn batteries. Great reviews, well built and seems like a good company. Also received a suggestion to check out Firefly batteries.
What’s it all cost?
The final cost for the equipment needed for phase I is $1,282.50 CAD, including taxes. Still need to pay for a mounting solution and a certified electrician.
This is going for top end equipment and we didn’t really need the power monitoring system. Could have gone cheaper but I want to do this right.
Thanks again to Pat Tasse from SunTech Enterprises for my constant barrage of e-mail questions during this process. I counted 19 e-mails each filled with questions going back and forth between us!
Reference material
Here’s some reference material for learning more about solar. Please leave a comment if you have any other good sources or if you have any comments/suggestions on my setup!
YouTube
- Basic Solar Parts Needed for a DIY Camper Van or RV Solar Install – this needs to be the first video you watch. I had no idea how it all connected until I watched this one video.
- Will Prowse Off-grid Solar Power Channel – this guy is very enthusiastic about what he does and has a great way of explaining things. Also great to see that this guy has used these videos to get himself out of living in a van on the street and is now very successful.
- Pacific Yacht Systems with Jeff Cote – lots of great information all specific to a marine environment.
- Difference between Monocrystalline and Polycrystalline by altE Store
PDFs and documents
- Wiring Unlimited, A Victron Energy book by Margreet Leftink – a great introductory read.
- Victron Energy Whitepapers – tons of interesting information but not all relevant, lots of inverters and non-marine information. And it’s all focused on Victron, of course.
Forums
- DIY Solar Power Forum – this was started by Will Prowse after he got overloaded by questions from viewers.
- CSOA Online User Group – for CS sailboat owners, this online group started 10+ years ago as an e-mail Listserve and the entire history has been saved within groups.io.


1 Pingback