Raising the mast on a Macgregor 26x
These are my instructions of raising the mast on a Macgregor after having it setup for trailering. These instructions are specific to our 2002 Macgregor 26x, but should apply to other Macgregor sailboats as well.
Tools needed
- Two 9/16″ wrenches
- Two 1/4″ wrenches
- Mast raising pole, with bolt, line and block and tackle pulley system
- Winch handle
Before starting, check the mast for damage and ensure the pulleys at the top of the mast for the jib and main halyard are not tangled. Confirm the VHF antenna is not damaged and securely connected. Check all the spreaders and stays to ensure they are not tangled or caught on anything.
Tip: Close the sliding hatch now and keep it closed. This will provide you with more standing area on the deck.
Tip: If you haven’t done it in a while, use a Teflon spray for the sail channel in the mast. This will make raising and lower the sail easier.
These instructions use the mast raising system. You can do this without the system, the mast isn’t all that heavy. But I find with all the things that can snag and catch the mast as it’s going up it is much easier to use the mast raising system because it can safely hold the mast in place while you fix the tangle.
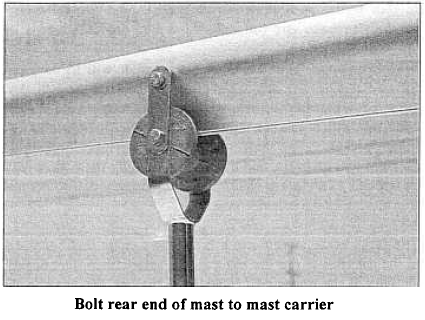
Step 1 – Unsecure mast from mast carrier and front rail
Using the two 9/16″ wrenches, undo the bolt from the front rail.

Using the two 9/16″ wrenches, remove the bolt from the mast carrier.
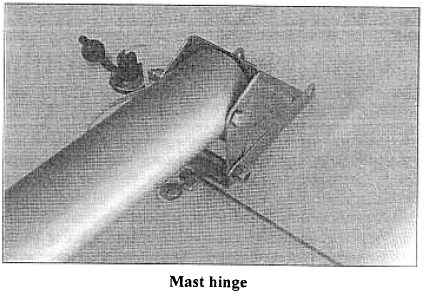
Step 2 – Secure the base of the mast to the mast hinge
Holding the base of the mast, slowly slide the mast toward the stern of the boat, taking care of the stays. The mast should slide along the mast carrier pulley on top of the steering pedestal with minimal effort. If it doesn’t it means it’s caught up. Stop and look.
With the base of the mast pushed back toward the mast hinge, use the bolt you just removed from the bow of the boat to attach the mast. Don’t over-tighten the bolt, it should be snug but doesn’t need to compress on the mast.
Step 3 – Setup mast raising system
Start with attaching the mast raising pole to the mast hinge. Make sure the block and tackle are facing toward the deck.
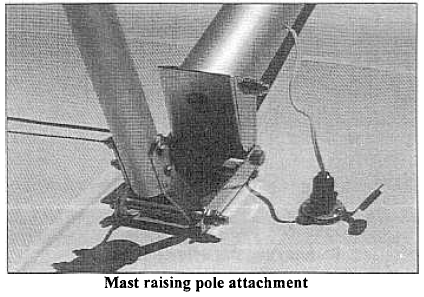
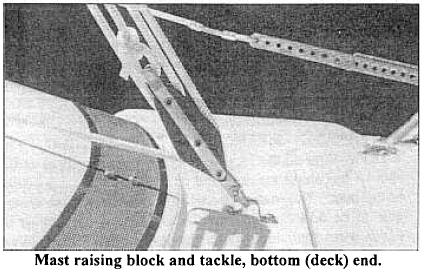
Attach the block and tackle to the deck.
Attach the jib halyard, extending from the top of the mast to the top of the mast raising pole.

The jib halyard should run from the mast raising system to the top of the mast, down the mast and secured to the cleat on the side of the mast. You want to adjust the length of this so that the mast raising pole is at 90 degrees. This will give you plenty of room in the block and tackle to pull that mast raising bar down to the deck of the boat.
The mast raising block and tackle should have a line extending back to the cockpit and wrapped three times around one of the winches.
Step 4 – Prepare to raise the mast
Before you start pulling on the mast raising system, take a breather. It’s extremely important you make sure everything is ready before you start hauling up the mast. If something’s wrong or something slips, it will cause a lot of damage.
- Mast raising system and lines secure. Line wrapped around winch properly and not tangled in anything. Winch handle attached.
- Jib halyard line adjusted to right length and secure
- Side shrouds (or side support wires) properly attached. 1/2″ of play while mast is down.
- Mast shrouds properly attached (this is what will keep the mast from falling over sideways when you lift)
- Rear stay untangled and block opened up to extend the length
- Mast stays are on top and clear of life lines
- Only two people on the boat, can be done with one, but better with two. More than two is too crowded.
Step 5 – Raise the mast
Have one person at the winch and a second person standing on top of closed hatch cover. The mast is heaviest when lying flat. You could get the winch to do all the work, but it’s much easier to have the second person lift the mast at the same time. Once it’s at 45 degrees, it’s much easier to winch and the second person doesn’t have to lift anymore.
Start lifting the mast. Always check the shrouds and spreaders, they like to get caught up. Stop at points, lock in the line leading to the mast raising system to hold the mast in place and take a moment to double check that nothing is tangled up.
Check the side shrouds to make sure they are not too tight. If you’ve adjusted while the mast is down there’s a good chance they are too tight and would pull right out of the deck. The outer shrouds, the ones near the outer railing of the boat will be doing most of the work once the mast is up. These should become like a really loose bass guitar string.
The second person will have three jobs. Lift the mast for the first bit. Check and free up any tangles. Grabbing the foresail furler and slowly walking it to the bow of the boat. Otherwise the furler is going to flop about and drag across the deck.
Step 6 – Attach the furler to the forestay connection
This is the point where you will quickly be able to tell if you don’t have any tangled lines. The furler should be very close to the chain plate on the bow of the deck.
 If it’s nowhere close, like the above picture. Then something is tangled up. Double check the backstay and double check the cable at the top of the furler. If it’s close, then you use the winch to tighten the mast raising system and bend the mast, just slightly, forward so you can attach the jib.
Attach the furling jib to the top foremost opening in the forestay connection. You need to use clevis pin. Make sure brackets in the furling jib are parallel and not bent in, or out. This connection seems a bit suspicious to me, I think I would feel better having spacers, maybe bolts, on either side to prevent the connection from sliding slightly.
Step 7 – Tighten backstay and double check everything.
Now the jib is firmly attached, you can slowly release the pressure on the mast raising system. Give it a few inches of slack, but don’t completely remove it yet.
Pull the lever over on the tightening block on the backstay to tighten up the system.
All the support wires should be tight. The mast should have a slight bend in it. It should look like a bow facing forward. Or the middle of the mast should be about 2″ forward of a straight line.
Secure all the clevis pins and rings (all chainplates / shrouds).
Don’t forget to attach the VHF antenna and the steaming light wire from the base of the mast to the deck.
Step 8 – Attach boom and main sail
Use the 1/4″ wrenches to attach the boom to the mast make sure the open channel for the sail is facing up.

Attach the Boomkicker, it connects base of the mast to the deck of the boat. This will help hold up the mast while you complete the rest of the steps. You can also take the main halyard and attach it to the end of the boom to hold it up.
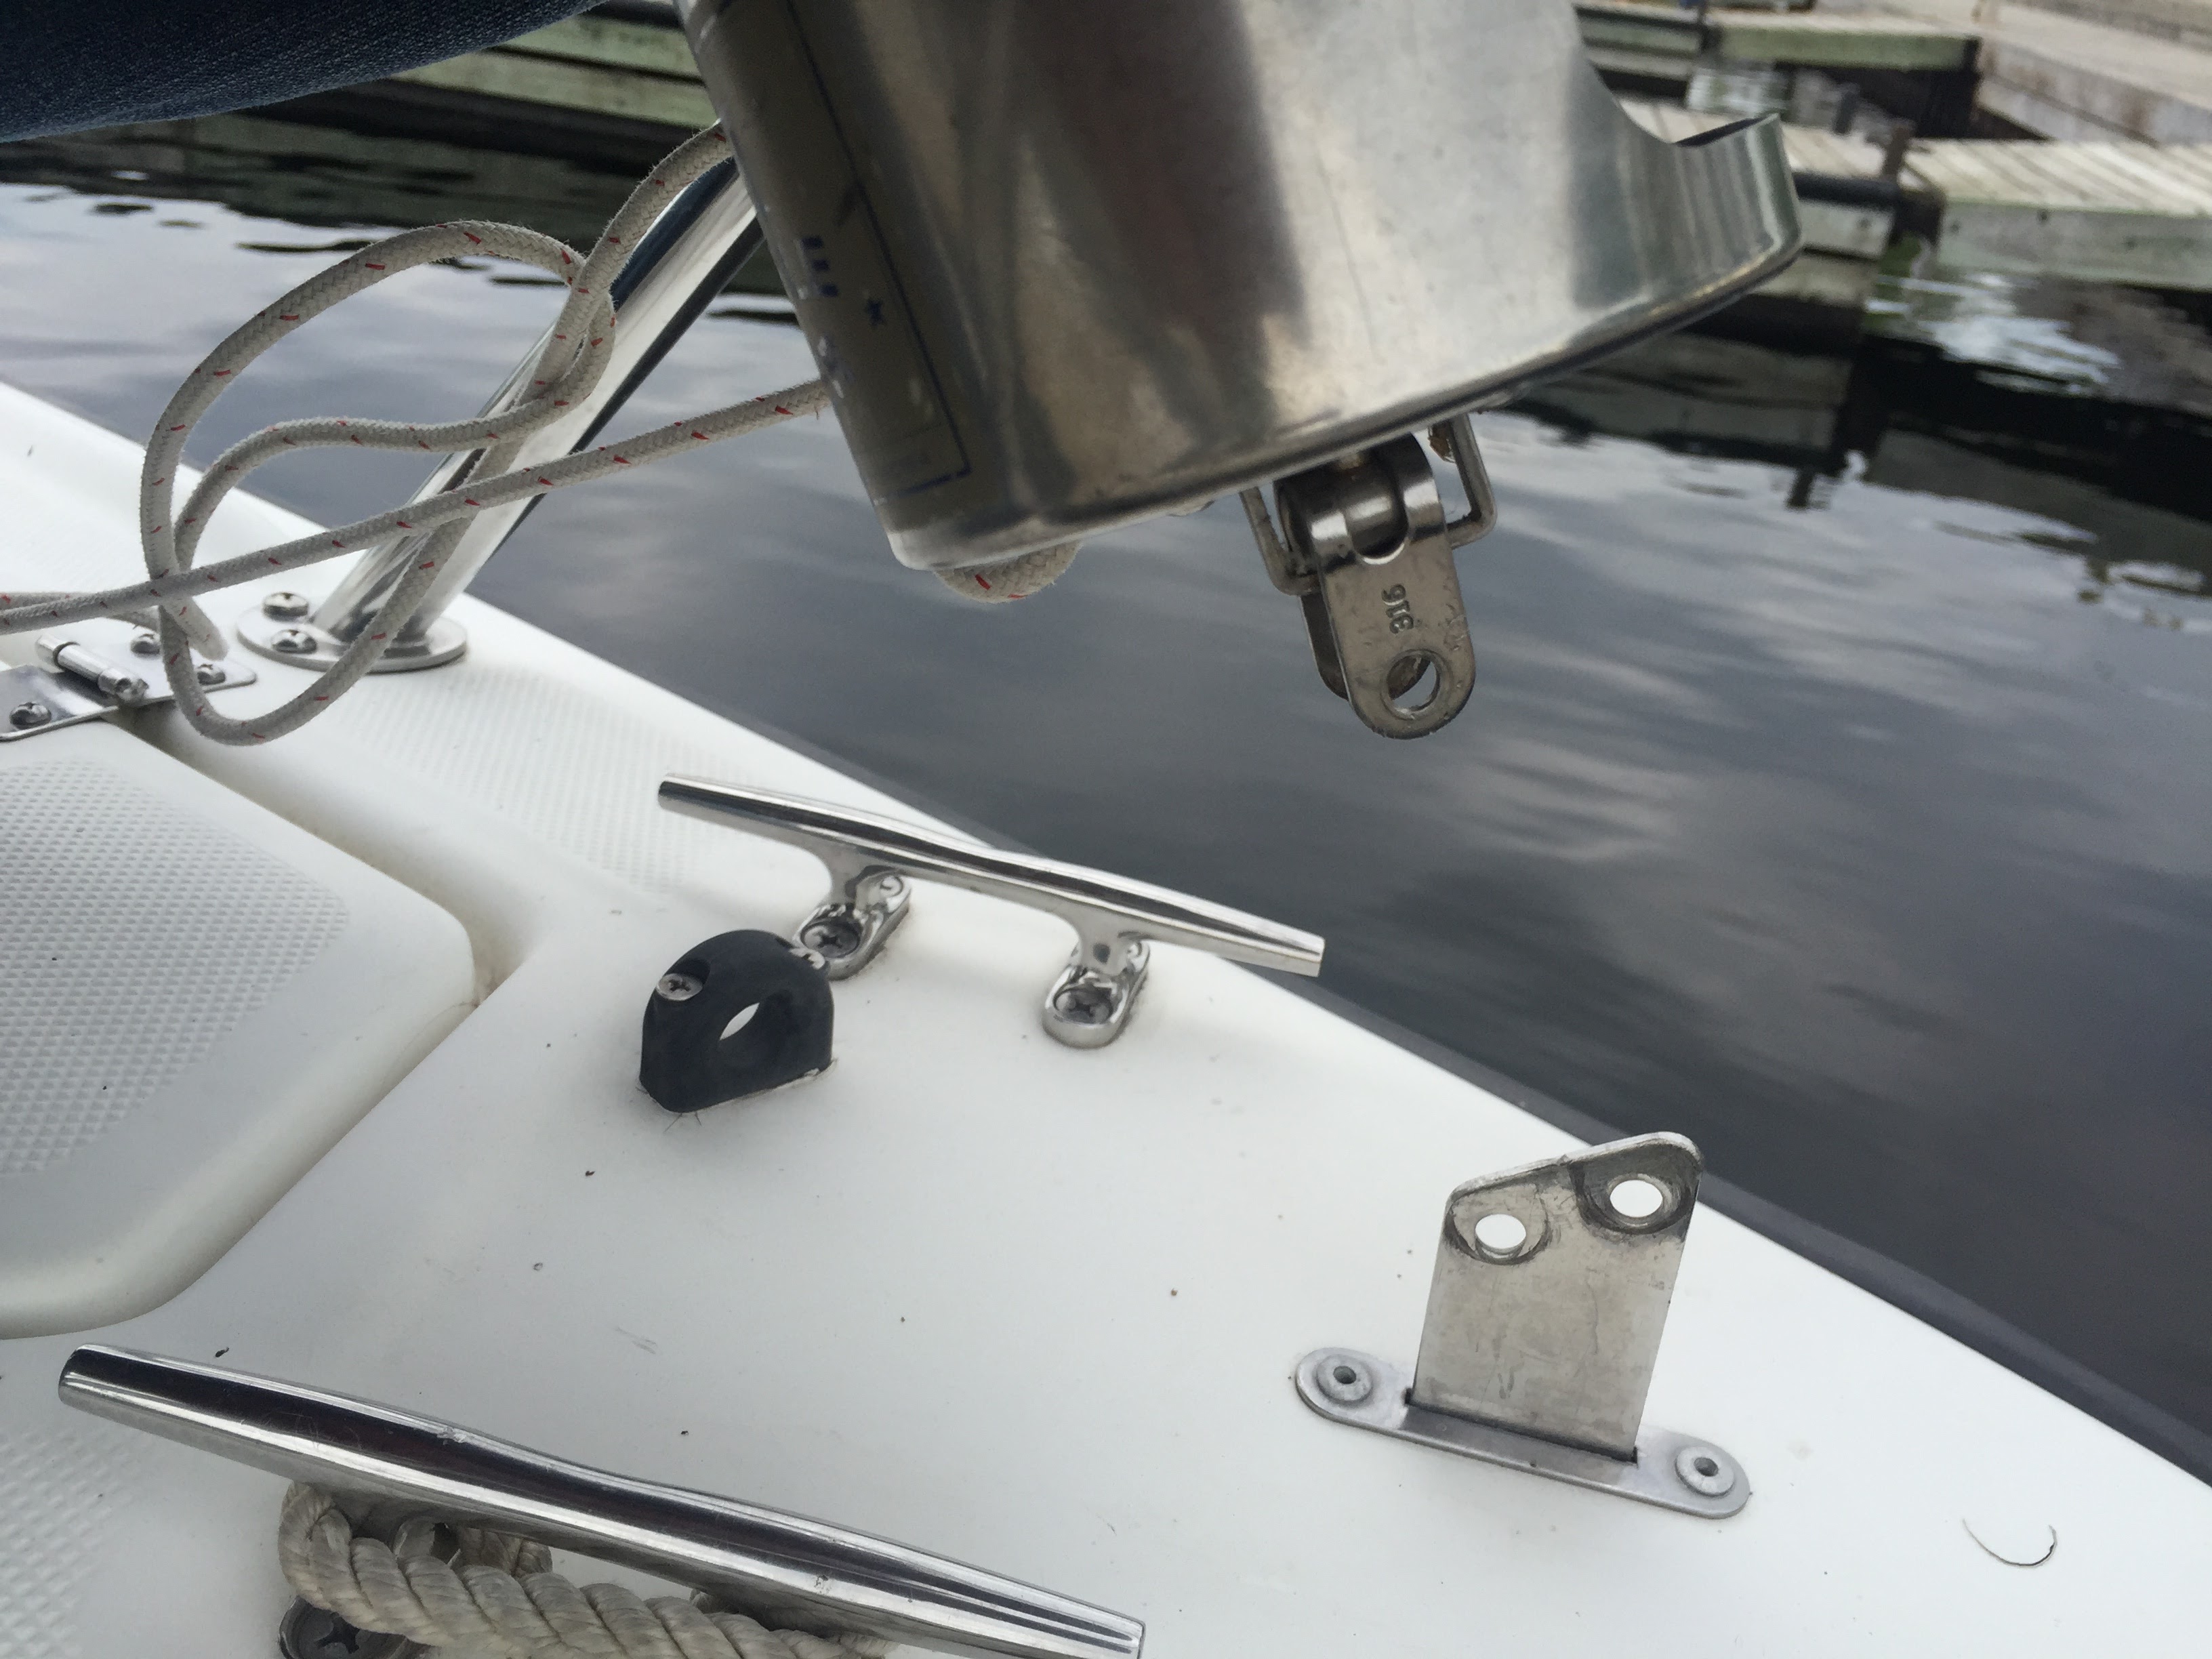
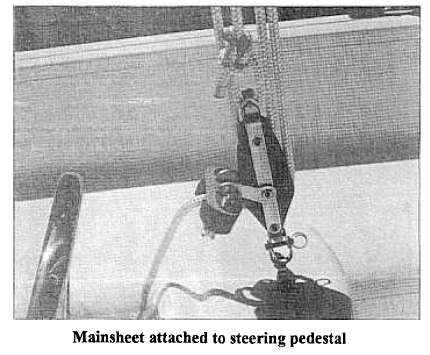
Connect the mainsheet. First, make sure it the line is threaded correctly through the blocks.
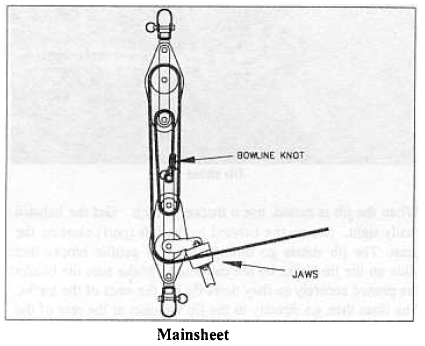
The lower end is attached to the top of the steering pedestal.
The top end is attached to the ring on the boom.

Now you can feed the mainsail into the mast and boom. This can be a bit tricky on a windy day which is why I think feeding up the mast first could be easier, the sail will flap but won’t try to power the boat.
Attach the head of the sail (top), it has an aluminum plate attached to it, to the main halyard. Start feeding the sail into the mast and have a second person use one of the winches to slowly pull the main halyard as you feed the sail into the mast. As it approaches the top, you want to align the eyelet in the sail lines up with the bolt. Use this to attach the bottom corner of the sail to the mast.
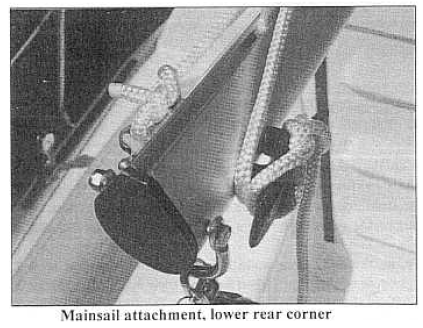
If it’s windy, release your mainsheet so your boom can swing away from the wind. You can also try lowering the sail most of the way down. Feed the base of the sail into the boom and attach the outhaul to the end of the sail and tighten to the cleat on the starboard side of the boom.
Now you can fold the sail onto the boom. Pull the sail as far up as you feel safe to do in current wind conditions. Then as one person slowly lowers the sail, the second stands in front of the mast and reaches around on either side and folds the sail to either side of the boom. Use the sail ties to secure the sail to the boom.
Step 9 – Prepare the jib sheet
I’m assuming the jib is already wrapped nicely around the CDI Jib furler. If not, then you’ll need to hoist and furl the jib. I need to create separate instructions for this.
The middle of the jib sheet is attached to the jib.

These sheets then go down both sides of the boat and feeds through the jib sheet blocks attached to the top of the cabin.

Make sure the sheet is fed through the lifelines so it won’t get tangled when the jib is out. You can adjust the block forward or backward depending on the conditions and how much you are pointing to wind.
Some advice from the owner’s manual: “When you turn the boat into the wind, if the top portion of the jib collapses and loses its shape before the bottom part of the sail, move the blocks forward. If the bottom half of the sail collapses first, move the blocks to the rear.”
Note: Photos taken from the Macgregor manual and reproduced here without permission. If anyone has an issue with this, please let me know and I will promptly remove them.
Lazy Jacks (Optional)
I removed these from the rigging right after we bought it. I had enough ropes and gear that I needed to figure out first. They help fold the sail over the boom, very useful for single handing or if your crew doesn’t like to get up on deck.

If you decide to install, check out the user manual here:
http://www.harken.com/uploadedfiles/Product_Support/PDF/4058.pdf
The connectors are already attached to the mast and the boom. You just need to re-attach the two wires with pulleys to the mast. Run the control lines around the boom through the pulleys. And then attach bungee cords to the side stays to pull the two wires outward away from the mast.
If you just want to temporarily lower and raise the mast to get under a bridge or to move the boat on the trailer a short distance then the steps are much simpler. You just need the mast raising system setup and then you follow the instructions to release or attach the forestay. The boom and sails stay on for this.
August 7, 2019 at 1:27 am
Wow, it’s been a long time since I’ve looked at these instructions. I’ve updated with a few minor corrections. But it reminds me how much we’ve learned over the years. This process seemed so scary and complicated when we first bought the boat and now it seems so simple and easy.
Let me know if you have any questions, or alternate suggestions for raising/lowering the mast on your Macgregor!
March 16, 2021 at 10:38 pm
Hi
My Macgregor 26x- just bought it lol
has the back stay attached only to the starboard side of the stern
Is it supposed to be like that ? Or am I missing another wire that should come from the mast and attach to the port side of the stern ??
March 17, 2021 at 12:05 am
Hi Yash,
Congrats on the purchase!
Sounds like the same as what we had. The backstay went to the starboard side of the rear transom and was a bit lopsided. I guess they did this since the center is blocked by the rear seat flipping up and didn’t think it needed a second backstay to the port side.
May 26, 2021 at 5:55 pm
Thanks Shane, very helpful. Just bought a used 26x and reading up on all the tips & tricks. This was great. One question I can’t find an answer to yet is the mini-stays that attach ~1/3 way up mast and to the topside directly between the mast and the side stays. Are. These just for stabilizing while mast-raising, and to be removed after the mast is up? Or do they stay on permanently? They really restrict movement to foredeck, are secured at the hull with a slipthru L-bracket and a bolt that sticks up and doesn’t go into the deck. I’d like to remove them, but most pics and videos I find show these mini-stays in place while sailing. Any recommendations? Thanks again.
Best,
Max
May 27, 2021 at 11:12 am
Great question Max. Yes those two side shrouds are definitely helpful keeping the mast on center while raising and lowering the mast. Once raised, you are correct they don’t appear to be doing much as they remain pretty slack. And agree, movement on the deck is difficult. However, we always kept ours attached, just in case. Maybe others can chime in on their thoughts for these.
August 12, 2021 at 8:26 am
Hi Shane, yes the two mini-shrouds are just for raising and lowering. If you remove the raising pole they come off with it.
Matt
August 18, 2021 at 2:36 pm
Does the aft end of the boom connect to the top of the mast to hold it up? Or does the aft end connect to the middle of the mast wire backstay ? Confused lol . Or does it even need to be held up?
August 18, 2021 at 3:17 pm
Good question Rab, it’s confusing at first!
We had a boom kicker at the front of our boom that was like a springboard pushing up on the boom. It’s a nice addition to make.
If you don’t have that, then most people would use the main halyard to extend from the top of the mast and attach to the aft end boom to keep it up. The boom will flop down when you first move this halyard over to the top of your main sail. But the boom will lift back up as you lift the main. Or some will run a second line up the mast to the top and then to the end of the boom (“Topping Lift”).
Lots of options, but o not attach it to the backstay. That will cause issues.
September 23, 2021 at 7:32 pm
Do you run the two jib lines that go back to the cockpit outside the two shrouds outside? Thanks
September 23, 2021 at 10:23 pm
Yes you do. You will quickly realize why this is important if you don’t do this.
October 18, 2021 at 12:53 pm
Thanks for uploading this. Just bought a 2002 Mac 26x for day sailing and overnighting in Florida. Looking over your instructions has broken it down much better. I’ve just got to learn all of these new words. 🙁 Thanks so much though!
October 18, 2021 at 3:33 pm
Glad my instructions are helping you Christopher. And agree, there’s a lot of new and strange terminology used on a sailboat that takes time to learn. And it is useful to learn when you have others on the boat or when you are trying to quickly explain to someone else an issue on the boat. Much easier to say, “the main halyard”, rather than, “that rope thingy that goes over there then up to the top of the mast attached to that big white cloth thing that makes the boat go forward in the wind”. 🙂
Here’s a good reference. Print something like this out and put it on your fridge.
https://www.discoverboating.ca/boating/sailing/parts.aspx
August 9, 2024 at 12:37 am
Hello! My name is Wes. I have just inherited a 26X and it has seen better days. I am in the process of getting it back into ship shape and I have a lot of questions. Is someone still monitoring this conversation?
September 10, 2024 at 4:39 pm
Answered directly via email.