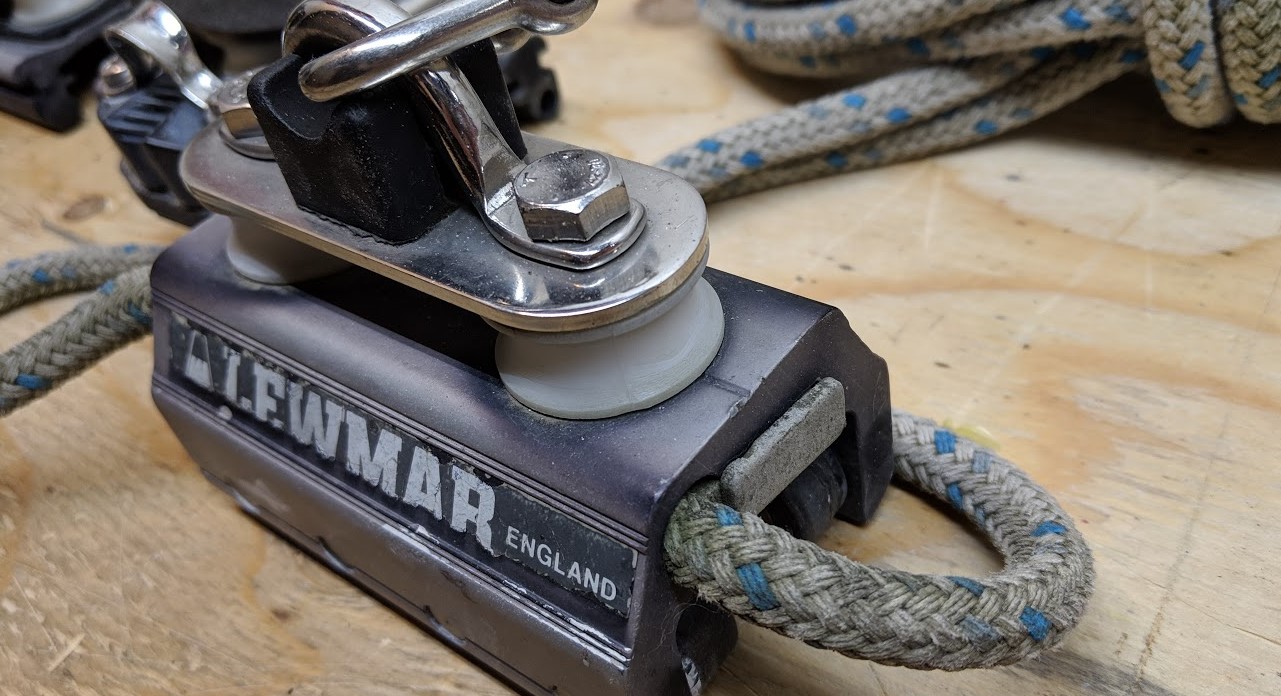
Our traveller was due for some needed maintenance. Spent some time today cleaning it up.
When we pulled our boat out of the water last fall we took apart the traveller to bring home. We had an issue with it on our way to Toronto Island and I needed to figure out how to detach the lines since we ordered brand new ones.
Removing the cars from the traveller
To remove the cars from the traveller you need to remove the two end blocks. Remove the three screws from the top of the end block and pull off the plate and the two different sized pullies. The two rubber stops should be left alone, I first thought I had to remove them and had a tough time getting them back on.
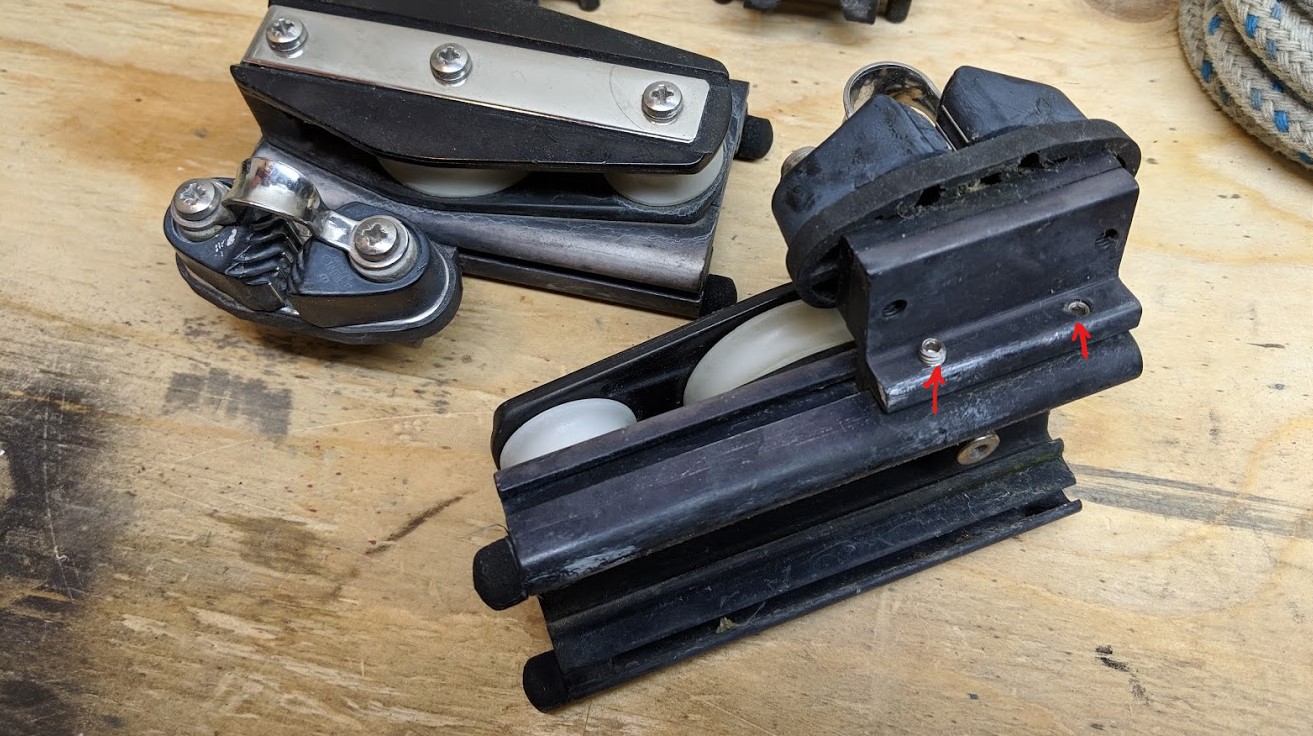
You will find the bottom of this is held in place by a stainless sleeve/slug that you need to pop out. Also loosen the very small bolt (requires an allen key). The end block should now slide off the track easily.

Cleaning up the traveller
These end blocks and the car been sitting in a box waiting for me to find time to work on it, today I had time!

I was lucky, the bearings on the traveller car rolled OK. There is a bit of pitting in the plastic but they all still felt solid and rolled smoothly. Others have reported that theirs were falling apart and are looking for a replacement. If you find one, let me know!
I couldn’t figure out how to pull the lines out of the car, I originally thought the two rubbery wedges could be pried out but after a gentle attempt I was worried I would break something. Good thing I stopped, I later found out that you need to pull the two 1/2″ bolts out to release these plastic wedges.
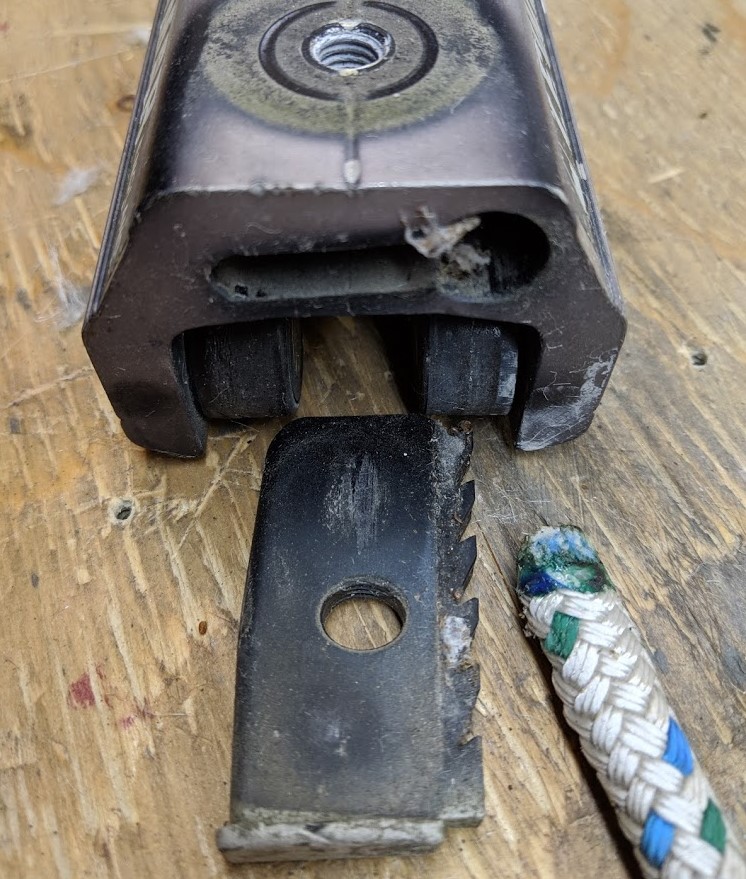
You can see the plastic wedge is held in by the bolt passing through that opening. Once the bolts were out it slid out very easily.

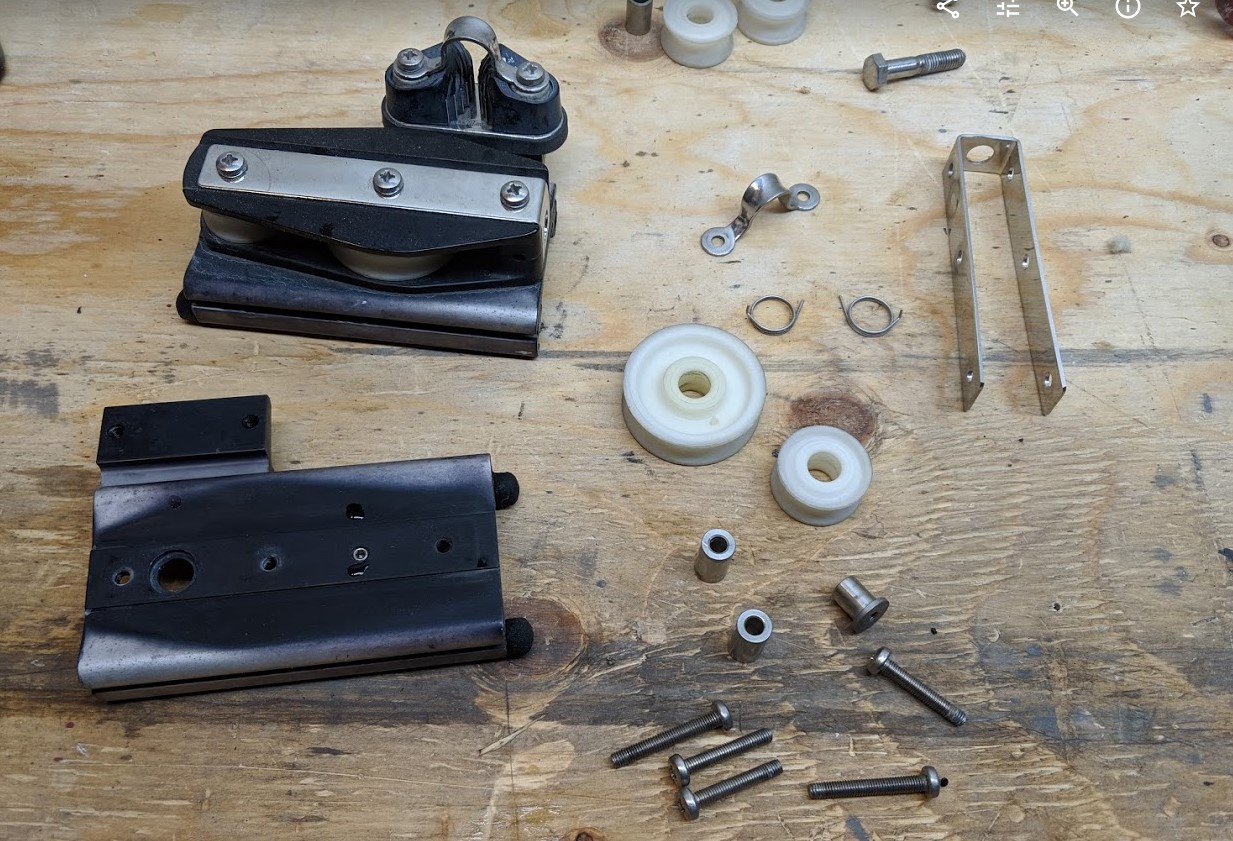
Here are the parts from the top of the car, took a quick photo so I wouldn’t forget how they go back together. Note: this is not the correct order, the plate goes on top of the pullies. See picture above.
The two end blocks were in decent shape but we had issues with one of the cleats coming loose and sometimes slipping. We think the new lines will help but also wanted to clean up the teeth just to make sure.
To remove the cleats you need to loose then two allen key bolts underneath and slide the cleat out.
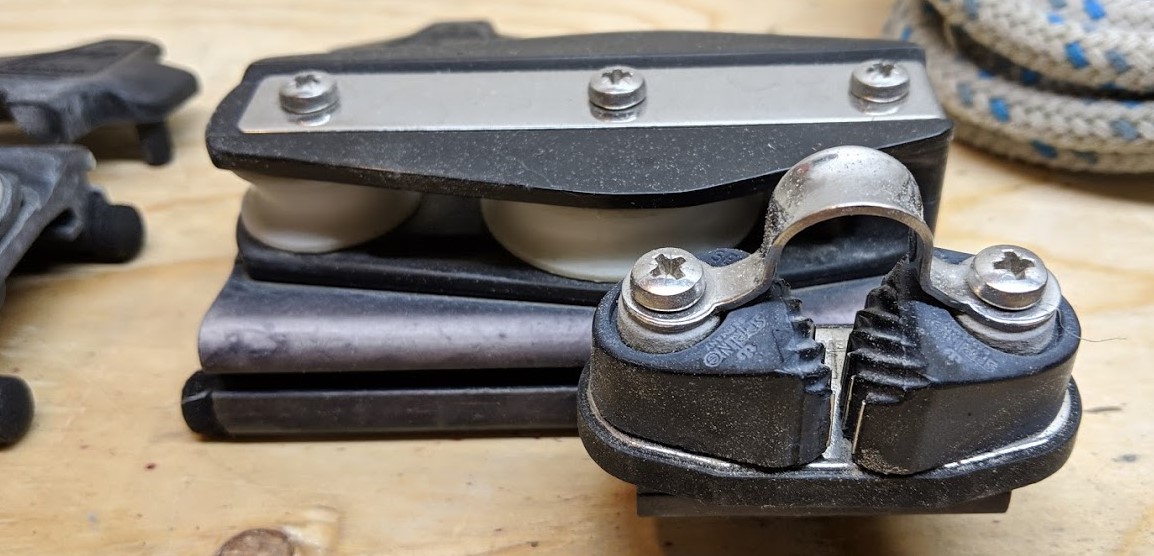
After taking apart the cleats I disassembled the rest of the end block.
The plastic cover housing the two pullies is held together with the stainless bracket. After this was removed the plastic cover separated into two pieces making it easy to remove the pullies. The two coiled springs came from the cleat.

Here is one of the cleats taken apart. I wasn’t sure how much trouble I was going to get in pulling it apart. I was able to clean out the cam teeth with a toothbrush and even was able to put it back together relatively easily afterwards. You place the spring on first, in same direction as photo, you then slowly lower the cam on top of it twisting it to catch the spring. The little rubber cap then slides on and holds it temporarily with enough friction until you get the bolts back in.
After everything was taken apart I threw it all into a soapy bucket and used a cloth and toothbrush to clean.
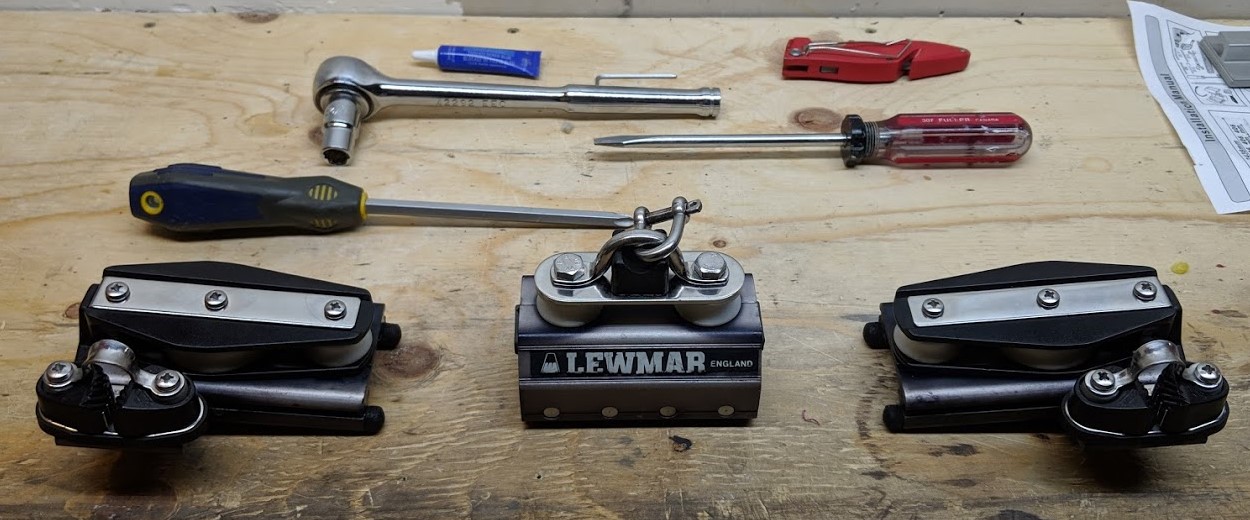
Here’s the final picture of everything clean and put back together. I used some locktite on the two bolts holding the cleat cams. I couldn’t do that yet on the rest of the bolts since I need to be able to undo the three bolts on the end blocks to re-attach to the Lewmar traveller track on the boat, and the two bolts on the Lewmar car need to be removed to attach the new line.
At the top of the pic are the tools I used. 1/2″ ratchet, flat head screwdiver, large Phillips screwdriver and knife wasn’t really needed. I used it to cut the lines when trying to figure out how to remove. I also used a small allen key and some silicon spray for the bearings in the Lewmar car and a little Lewmar winch grease for the pully bearings.
Lessons learned
- If you are replacing your lines, you really need to take these completely apart to do it. The three screw bolts on the end block need to be removed to pull the end block off the traveller track. This will allow you to slide the traveller car off the track. You then need to remove the two bolts from the traveller car to release the two wedges holding the line.
- The traveller line need to be a minimum of 13 feet long.
- Do one component at a time. Don’t throw everything into a bucket to wash at once. You may think you are saving time but then afterwards you need to figure out which bolts are 1mm longer.
- Take lots of photos, it seemed super simple but had to go back to my photos to recall how the top of the traveller car was assembled.


April 7, 2019 at 11:08 am
Thanks again Shane, this is a project I have to do this spring.
April 7, 2019 at 8:31 pm
Thanks for comment John. It definitely encourages me to write more knowing it’s helpful!
I’m going to add one more lesson learned, the rubber covers on the end of the stopping blocks. I feel like I shouldn’t have detached them completely. I think there was some sort of adhesive on the bottom two connectors. You can service everything just by detaching the top part. Will add photos later to make this a bit clearer.
June 13, 2019 at 11:48 am
I’m so glad you did this first. It was still quite a puzzle, even after reading you post -for example that tiny hex screw was hidden by 29 years of crud. I also managed to snap one of the bolts on the traveller car. I now have fresh lines on the traveller but I expect i’ll have to replace the car as the plastic rollers are near the end of their life cycle
June 13, 2019 at 3:27 pm
Hi John, glad this post was of some use for you. Let me know what you decide on replacing your traveller car with. Before I figured out how to take it apart I was considering just buying a new one. Eventually will need to do this, I don’t think my plastic rollers will last forever.
August 14, 2023 at 11:45 am
If you replace your traveler, would you be interested in selling me the end stoppers, and maybe the blocks as well, if they’re in good shape?
August 15, 2023 at 1:56 pm
Hi Guiherme, we are tempted to replace it, but not anytime soon. It fits into our rule, if it ain’t broken, don’t fix/replace it.
October 13, 2019 at 11:17 pm
How do the end blocks come off the traveler? I need to remove the traveler car to see if I can get someone to repair / replace the rollers which have deteriorated on my CS34. I want to avoid as much as possible replacing the whole system which would require replacing the track, which I imagine will be a real pain on this boat.
October 15, 2019 at 11:29 am
Hi Craig, thanks for the question.
I’ve updated my post to show how the end blocks come off. Not sure if you can get replacement cars from Lewmar. Let me know what you find out!
February 4, 2020 at 12:59 am
Hey! great article! I have the same traveller on a Mirage 29ft, and one of my rubber wedges is broken. Do you by any chance know what’s the official name of this part? or the ref. number for this traveller?
February 4, 2020 at 1:34 pm
Hi Andre, the traveller is from the Lewmar Solent product line. I believe the part is called a track end cap, or a track end cover. I did a quick search and couldn’t find anything. I’ve heard of others just replacing the entire traveller with a new system. Good luck, let me know how your search goes.
Did have better results searching for “Lewmar Traveller Stop Sheave”. This page looks promising, not sure of compatibility with existing track. https://www.lewmar.com/node/13228
July 5, 2021 at 2:36 am
Thank you, this was very useful
January 29, 2022 at 5:53 pm
Hi Shane.
i have that same traveller but i couldn’t get the lines out of the car. I have removed the two bolts to release the plastic wedges, but it is impossible.
Would you be so kind to show me how you have the lines installed?
thanks for the post, it has been very useful
January 30, 2022 at 11:39 am
Replied via email.
September 16, 2022 at 1:56 pm
Hi Shane,
Thanks for article. I am in the middle of the same job. Lewmar simply said I needed to purchase an entire new system (!) they offer no support and no replacement parts.
Have you by any chance found sheaves (the plastic pullies) or other parts that fits this system from a third party?
December 11, 2022 at 2:24 pm
Thank you for sharing this….I was stumped looking at mine recently so now looking forward to trying to attack it again! Much appreciate your photos & descriptions.
June 4, 2023 at 6:48 am
Thanks for the post very useful.
I have pulled my apart but my bearings are all broken up, did you have any idea where to get replacement bearings?
June 13, 2023 at 10:15 am
Hey Trevor, thank you.
I’m not sure where you can get them, I did a quick search and see others are struggling to find replacement parts as well. Did you ever find a solution?
June 4, 2023 at 10:37 pm
Do you have any tips for reinserting the control line into the car? What size control line did you use?
June 13, 2023 at 10:20 am
Hey Bryan,
We used 3/8″ lines. It’s only held in place with friction by that saw tooth plastic piece. No glue, no knots, just feed line in, put in the saw tooth plastic piece and tighten bolts back up.
September 13, 2023 at 9:26 am
Shane,
First I LOVE the name of your boat, Foghorn Lullaby. I’m a transplant to San Francisco and regularly fall asleep listening to the soothing sounds of the horns on the Golden Gate Bridge. It’s still magical to me.
Anyway, I have a 1985 Hallberg Rassy 35 with the same Lewmar Traveler you have shown how to refurbish above. I am so thankful for your explanation as it’s a job I’ve been putting off and putting off.
Your post has given me the courage to simply jump in and start taking it apart. I am missing one of the end caps on the traveler, but is looks like from the comments above that finding a replacement from Lewmar may be a lost cause. I’ll have to see what I can retrofit onto it.
Best,
Ben Shaw
BenjaminShaw@gmail.com
http://www.Dovka.com
July 10, 2024 at 10:09 am
I can’t find *any* other info about this system online, so thank you for this post! Any chance anyone ever found replacement bearings?