We were lucky to meet a very knowledgeable Lewmar rep at the Toronto Boat Show a few years back (pre-Covid) that showed us how easy it is to service a Lewmar winch. We finally find some time to try it out. Our winches were not feeling that crisp and had some resistance when turning by hand.
How often should you service your winches? Here’s what Lewmar says:
Lewmar winches, like any other precision engineered product, must be serviced regularly. Yacht winches are required to carry deceptively high loads. For example, the genoa sheet load on a 40’ (12 m) cruising yacht can easily reach 1000 lbs (453 kg). Regular servicing with attention to correct assembly and condition of parts is vital to the safety and performance of your boat.
- TWO OR THREE TIMES DURING ACTIVE SAILING SEASON: Lewmar winches should be stripped, cleaned and re-lubricated.
- AT THE END OF EACH SAILING SEASON AND BEFORE STARTING THE NEW SAILING SEASON: All Lewmar winches should be completely stripped, cleaned, thoroughly checked for damage and lubricated with reference to the information provided in the Lewmar Volume 10 Service Manual.
OK, I’ll admit I haven’t followed these guidelines. Wait until you see the photo of our jib sheet winch below.
Background and research
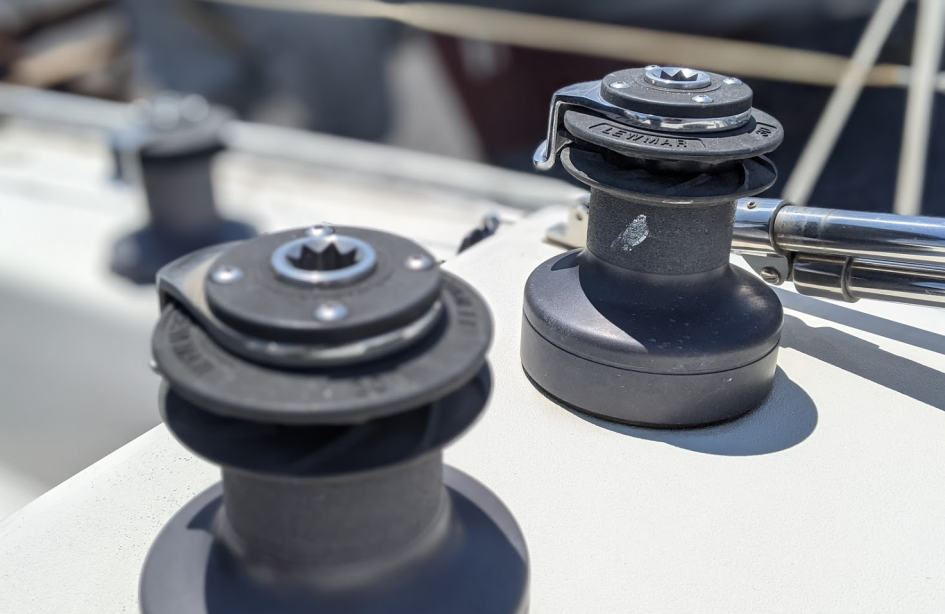
The CS34 comes in a number of configurations, but most are similar with the exception of the number of winches on the coach roof. We were lucky to have a total of four Lewmar 30 Ocean Series self tailing winches on our coach roof and two Lewmar 46 Ocean Series self tailing winches for our foresail sheets.
Lewmar provides some general instructions here: Lewmar Frequently Asked Questions – How do I service a winch? (Lewmar.com)
Specific instructions for our Lewmar Ocean Series winches can be found within Lewmar Winch Service Guide – Volume 6. This was difficult to find, p2marine.com was nice enough to have a copy. https://www.p2marine.com/documents/lewmar/lewmar_winch_manual_v6.pdf
I’ve also uploaded a copy here so it doesn’t get lost.
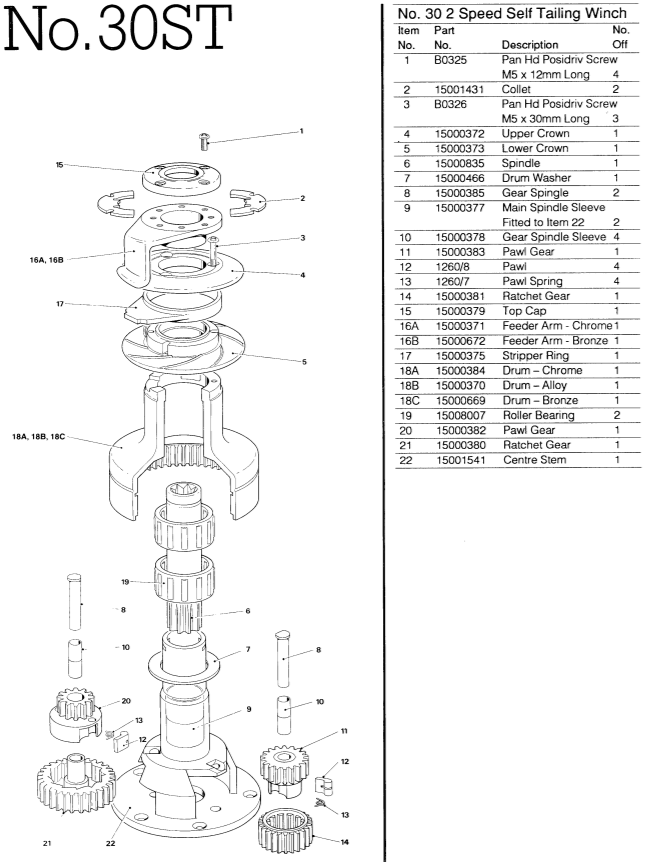
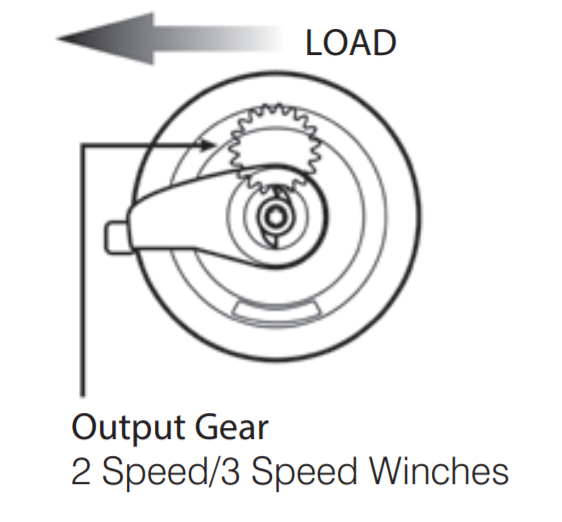
Here is the Lewmar 30 2-speed Self Tailing winch parts list from this manual.
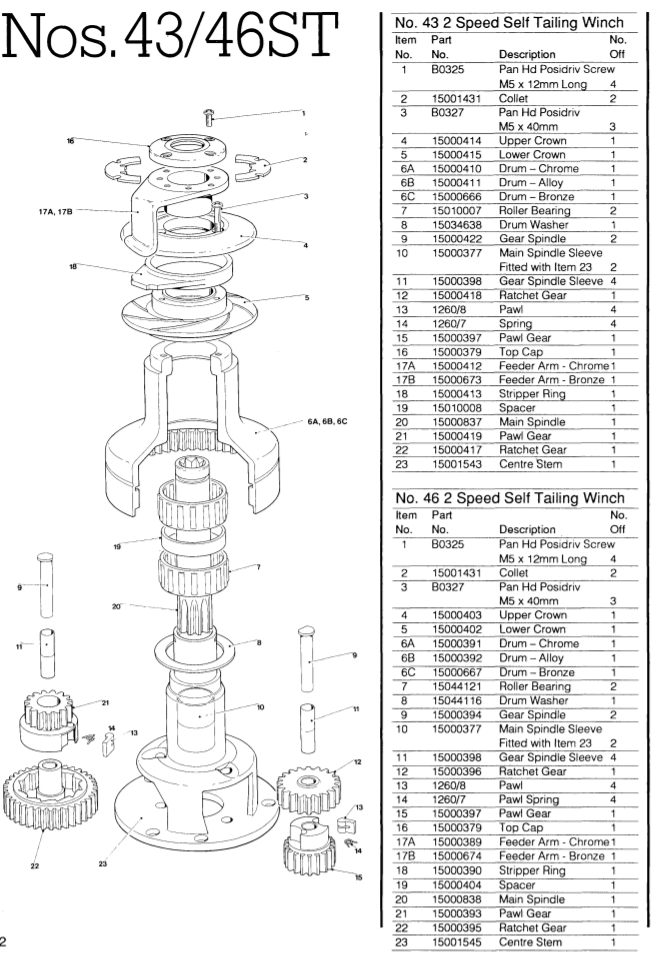
Here is the Lewmar 46 2-speed Self Tailing winch parts list from this manual.
Supplies and Parts Needed
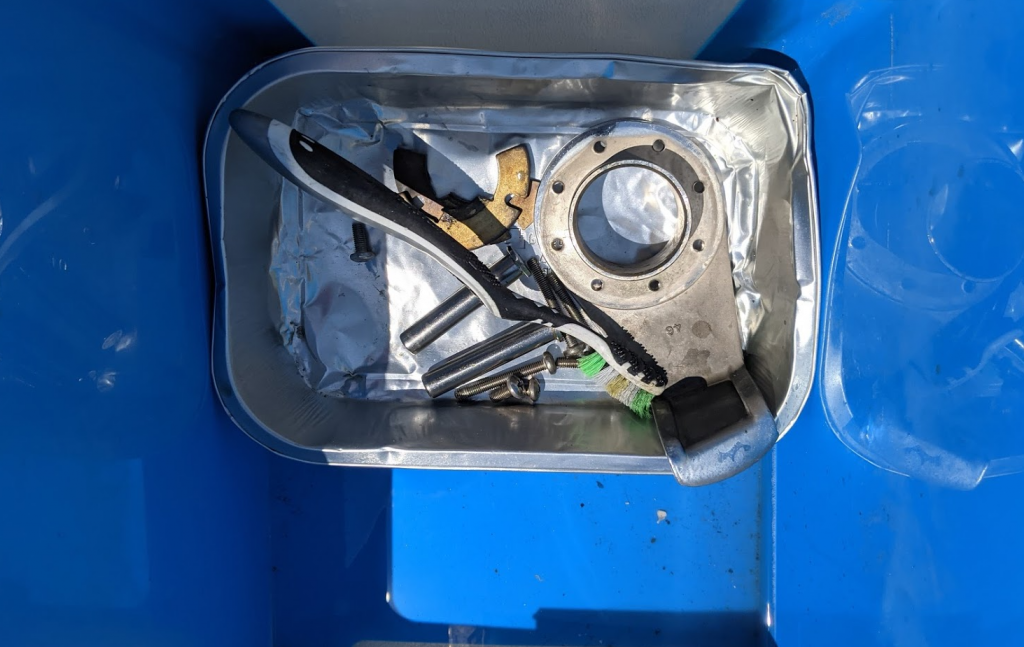
- Cleaning supplies, cloths, paper towels, degreaser, toothbrush, small plastic spatula.
- Bucket and container to wash the greasy bits
- Screwdrivers: Philips and flathead
- Gear grease – don’t overdo it. More is not better here.
- Light machine oil – this is used for the pawls.
- Replacement parts – the two main replacement parts you will need to consider buying is the pawl and the pawl spring. They are not cheap. I’m planning to only replace these if they are extremely worn or broken. I purchased eight of each, just in case.
- Pawl part number: 1260/8
- Paul spring part number: 1260/7
The issue on CS34 Sailboats
Several owners have discovered the same thing on their boats. CS installed the foresail sheet winches according to the following suggestion from Lewmar.
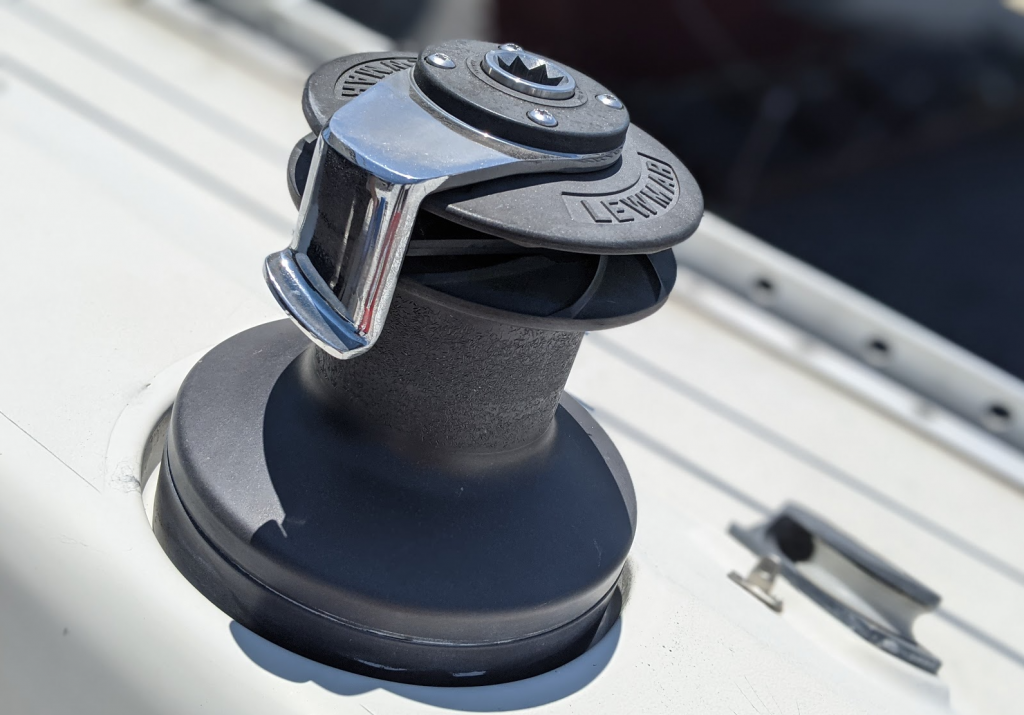
The winches sit in a slight recess and this orientation has made it impossible to fully service these winches without removing the winch. Thanks CS! Here’s what our disgustingly dirty winch looked like.
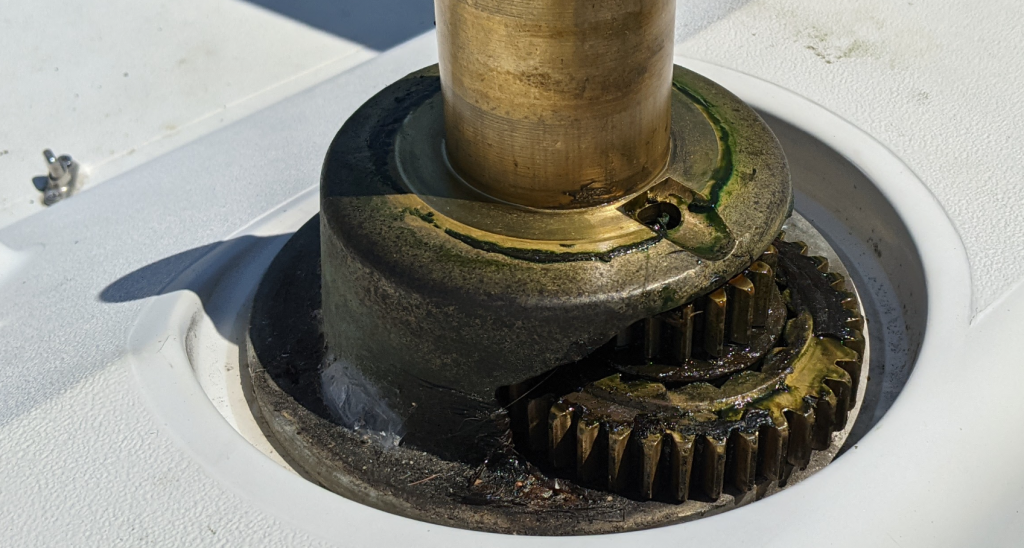
There is no way for us to remove the ratchet gear without removing the winch or cutting a big hole in the fiberglass. Some owners have rotated their winch but the existing holes don’t allow for this so they need to be epoxied over and then you will need to drill new holes in the new position.
Cleaning and replacing the winch
I’m not ready to remove the winches from our deck yet. So we twisted and scraped and brushed as much of this mess off as we could. Fortunately all of the other winches on the coach deck are fully accessible.
All of the winch bits were cleaned in a bucket with some degreaser. A plastic spatula is handy to scrape off some of the dried up grease crud and a toothbrush is useful for cleaning all the hidden grooves.
We also attempted the same trick we used on our clutches to restore the faded grey plastic parts.
They looked much better for about a week but are quickly turning grey again.
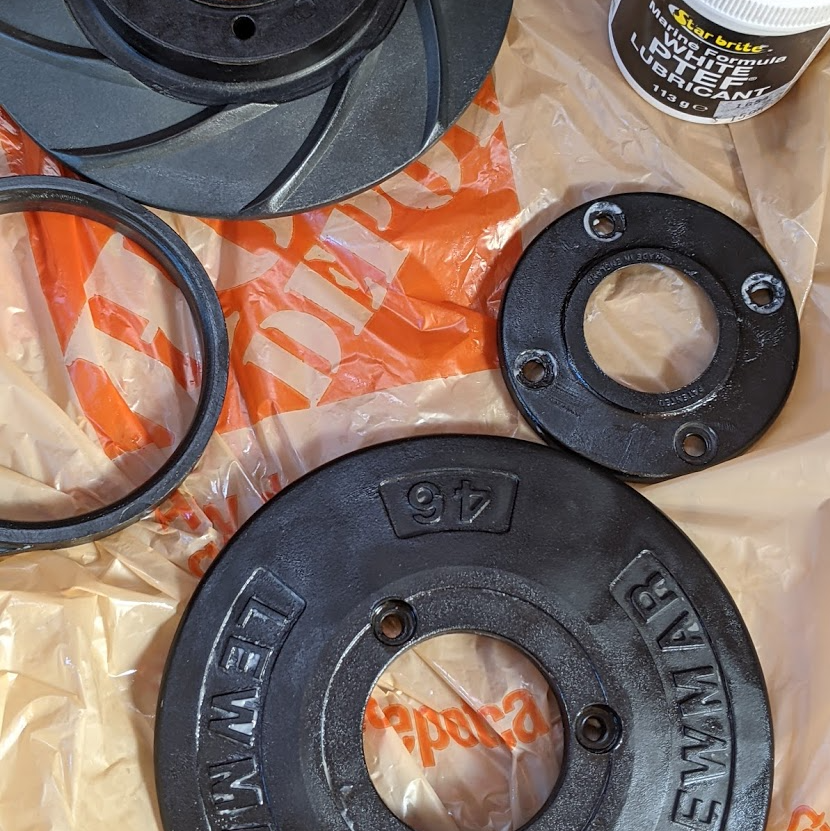
Dry everything off and then lightly grease all of the gears. This is where many mess up and cover everything with gobs of grease, this only collects crud and slows things down. Some suggest using a brush to spread the grease, we used a small piece of old cloth. Don’t put grease on the pawls, use a light machine oil. This will give you that crisp secure clicking noise you want.
Reinstalling all the parts were pretty straight forward. Just reverse the steps you took to disassemble. It can only go back together correctly. If you end up with a few spare parts after re-assembling, that’s a good indication you did something wrong.
Lessons Learned and Tips
- Have a container ready to catch all the bits – someone suggested a cardboard beer flat works great for this. You cut out a slot and a hole and you can wedge it under the winch before taking it apart. I think it’s a great idea and also provides a great excuse to go buy 24 beers for the boat.
- It’s really not that difficult – the parts only fit in the correct order. It’s really easy to take apart and put back together. Only issue we had was with re-inserting the collets. They wouldn’t fit properly until we slightly lifted the main spindle to get them to align to the slots in the spindle.
- Even easy projects can take 10x longer than you expect – the main winches couldn’t be completely disassembled so we had to clean it in place. This meant scrubbing and scraping four teeth at a time, rotating the gear and then repeat.
- Don’t lose any parts – be extra careful, parts and tools on our boat seem to be magnetically attracted to the water. Fortunately no parts were lost during this project.


July 4, 2021 at 6:57 pm
Perfect timing! “Somebody” broke the stripper ring so it looks like these are coming apart soon!
Thank you once again for making our maintenence easier.
July 4, 2021 at 7:07 pm
Glad I could help, good luck! Make “somebody” do all the cleaning of the dirty parts.
July 12, 2021 at 9:32 pm
Thanks for the posting the diagrams, great help! We got the part delivered today.
All the best!
__/)_
December 29, 2023 at 6:30 am
I need to order for a winch Lewmar 56 , same of the picture above:
-2 collet
-1 top cap ( with 4 screws )
wich is the procedure to recive these parts please ?
fabio scalzi
January 31, 2024 at 1:32 pm
I have a 1990 CS 40 and 4 of my winches are in those recesses. UGH! I was servicing one of the 46ST 2 speed winches when one of the gear spindles decided to jump ship into the drink. Now I need to find a new one. The Lewmar diagrams I have found are for newer winches and show the spindles are not the same size. I think on the older ones they are the same size. My question is which size to order. The part numbers available are different than your diagram. 45000323 is the Pawl gear spindle 9.5 mm dia’
45000324 is the ratchet gear spindle 10.9 mm dia. I’m not sure but I think both of my spindles are the 9.5 mm diameter spindles. Do you know if that is true?