
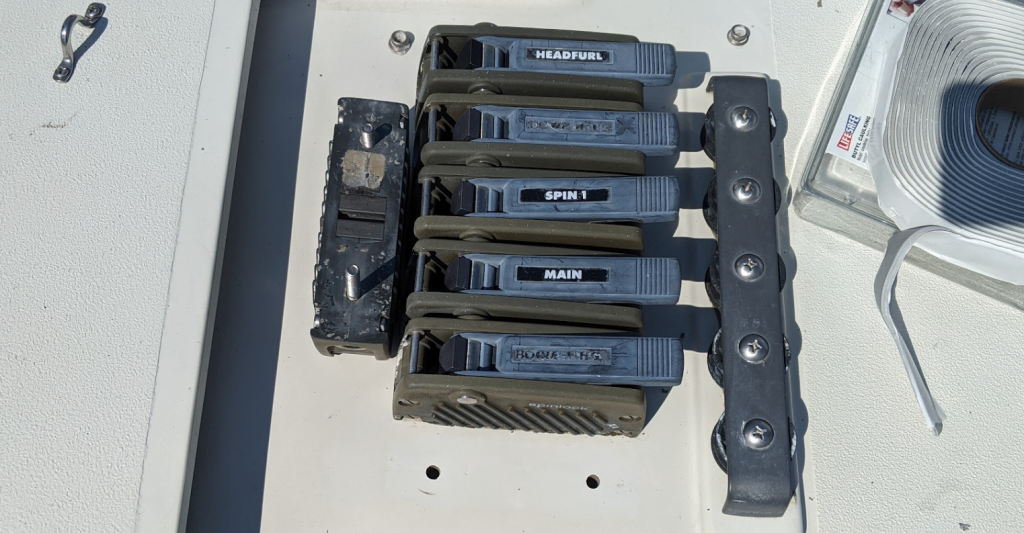
Our main sheet clutch has been slipping and we’ve lost faith in it. This means our main is usually wrapped around one of our winches as a backup. Today we take the clutch off the boat and give it a quick overhaul.
Spinlock Clutches on the CS34
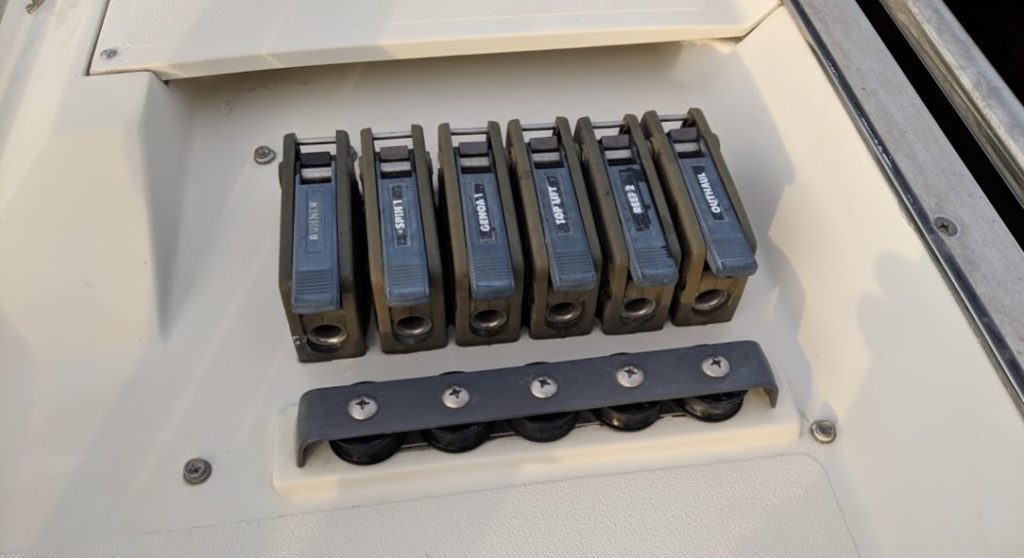
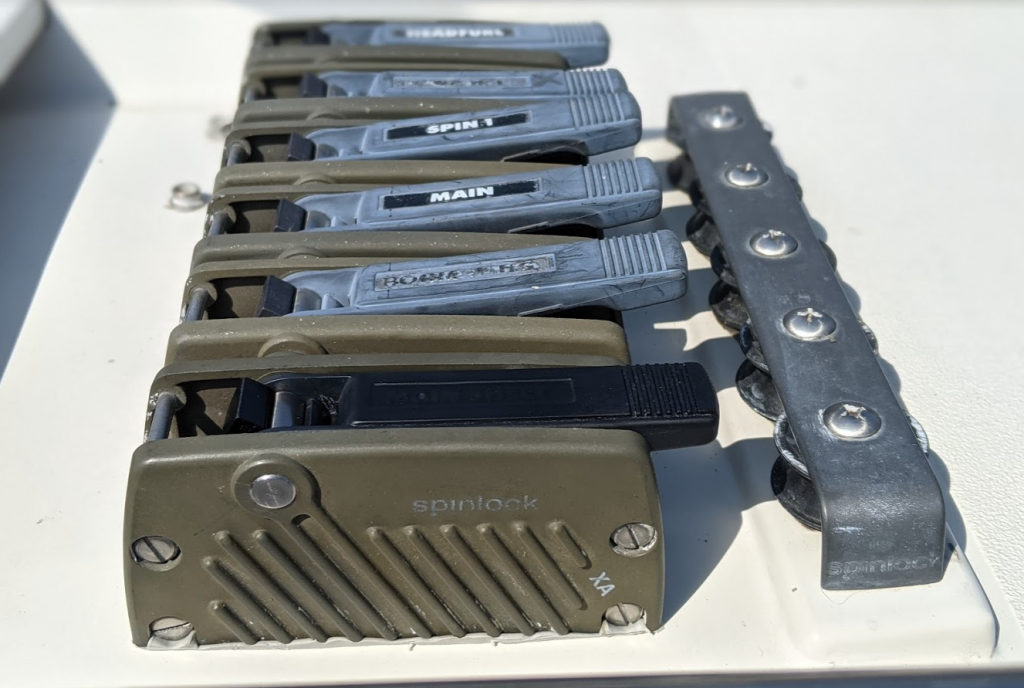
The CS34 comes with 12 single Spinlock XA clutches. Six clutches starboard and six clutches on port. These clutches can accommodate lines 6mm – 12mm (1/4″ – 1/2″).
If you are interested in learning how we organize our lines, see CS34 Running Rigging.
Replacement parts are not cheap. You should make the decision of continuing to service your Spinlock clutches or replace them with new ones. The main clutch gets used the most on our boat so it’s not surprising that it was the first to go. Our other clutches are still working flawlessly so we decided to just service the one. It was tempting to just replace them all with shiny new clutches.
The Spinlock XA and XAS clutches appear to be very similar and use many of the same part and I believe the Spinlock XAS clutches could use the exact same mounting holes.
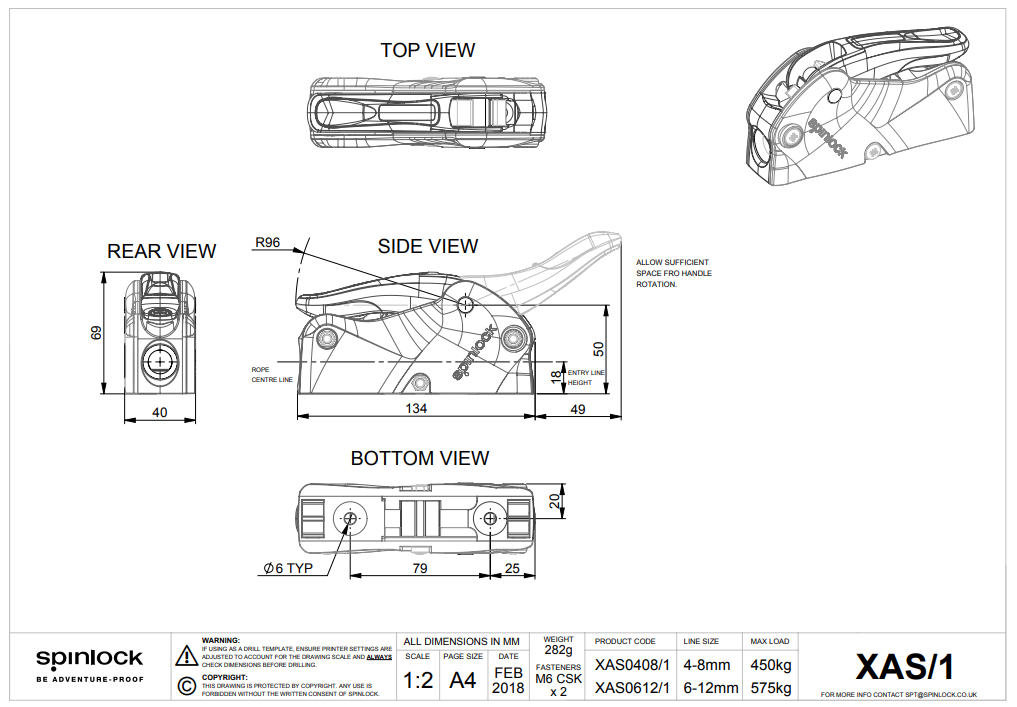
Spinlock XAS width is 40mm, XA width is 38mm. I would be concerned that there is not enough space to mount the singles side by side. If you were successful in replacing your Spinlock XA clutches with something new, and were able to use the same mounting holes, please let me know in the comments!
Replacement Parts for the Spinlock XA
There are two main friction pieces, the cam and the baseplate. You will need to decide if you are replacing just one or both. If you have a broken lever arm, you can follow these same instructions.
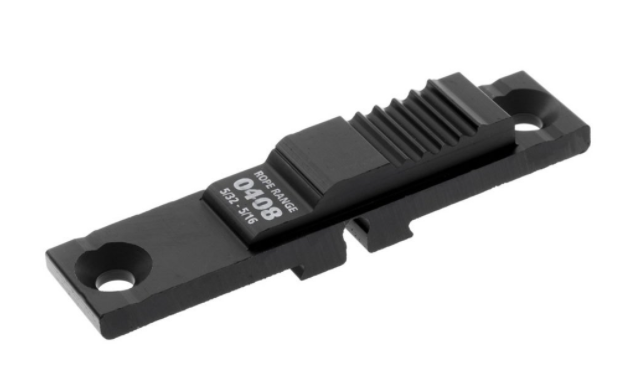
base plate 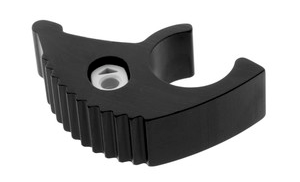
cam 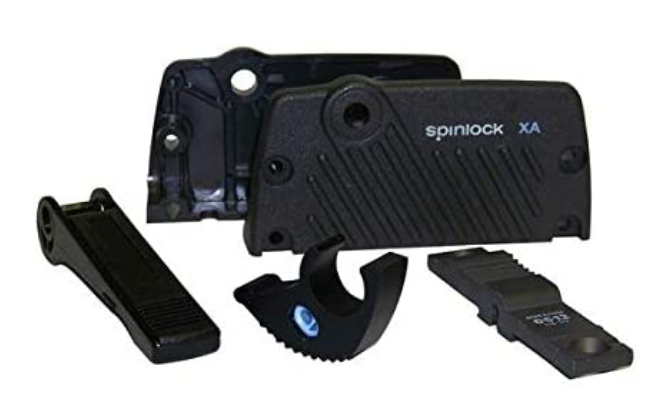
service kit
Here are links to these parts from Marine Outfitters in Kingston, ON. They have been good to buy from, they are local to me and they do ship world wide. I only purchased the cam for my clutch, in retrospect I probably should have replaced the base plate at the same time.
Spinlock XAS and XA cam module $23.99 CAN – this is the only part I bought
Spinlock XAS-BASE0408 for XAS 4-8mm Spinlock $23.99 – this is the base plate
Spinlock SA16 XA Handle $14.99 CAN – replacement lever arm, if you need it
Spinlock XA Spring Arm $13.99 CAN – good to know in case you lose or break yours
Note: Many of these parts are the same in the Spinlock XA and XAS clutches. Above prices and links from June 2021.
Instructions to Service your Spinlock XA
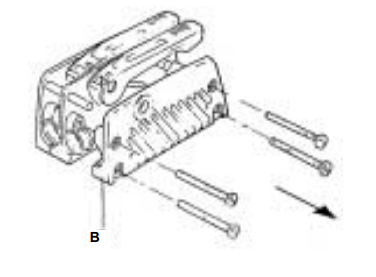
First, here are the official instructions from Spinlock.
- Remove rope clutch from the deck.
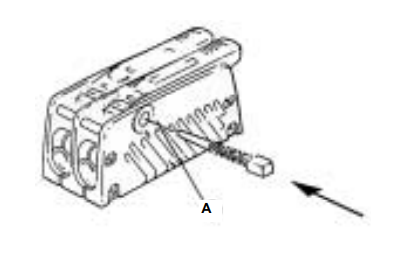
- Press out pin (A) through the handle lever / cam, using a punch. just far enough to clear side fairing (B)
- Note how spring arm rod is assembled.
- Remove handle lever & cam and replace with new parts.
- Refit spring arm rod and reinsert into the side fairings.
- Screw the 4 bolts on the body.
- Punch pin back through handle lever / cam and into side fairing taking care not to damage plastic sides.
- Check action is working correctly before securing and resealing to deck using silicone sealant or our neoprene gasket (XA-GASK).
Tools needed
- Philips screwdriver for removing ceiling panels
- Large Philips screwdriver for removing two large bolts from base of clutch
- Wrench (sorry don’t recall size)
- Vice-grip locking pliers (optional)
- Flathead screwdriver
- Small hammer
- Punch or bolt for removing pin
- WD-40 or penetrating spray (warning this can damage clutch materials)
- Silicone grease
- Butyl tape, silicone sealant or neoprene gasket
- Hard surface for tapping out pin, I used a roll of duct tape
- Container for parts
- Bucket soapy water
- Toothbrush
- A second person, unless you have really long arms that can reach both above and below the deck at the same time
Step 1 – Remove Clutch from Deck
This is one of the first times I’ve dared to remove any of the bolts going through our deck. For some reason I’ve always had a huge fear over doing this. In retrospect, it wasn’t that big of a deal!
- Remove Ceiling Panel – You are going to need to remove the ceiling panel from below the clutches. For our main clutch on the starboard side we removed the large panel in our bathroom, just be careful of the wires running to the light. It’s easier if you can squeeze two people into the bathroom to do this job. You should now see the bolts on the from the bottom of your clutches. If not, you removed the wrong ceiling panel. Try again.
- Remove two bolts from clutch – Open the clutch lever and look straight down. There are two large Philips head bolts there. Using the large Philips screwdriver hold these in one spot while a second person below uses a wrench to remove the bolt. The person with the wrench is doing the twisting, you want to keep the screw head from turning. If you are finding the screw is twisting, a trick is to attach a a Vice-grip to the shaft of the screwdriver to stop it from twisting. One hand pushes down hard on top of screwdriver while second holds the Vice-grip from spinning. Quickly put the bolts, washers and locknuts into your container before you lose them!
- Lift clutch up off deck – It may be a bit stuck so wiggle it off and straight up. The two bolts will come up with the clutch.
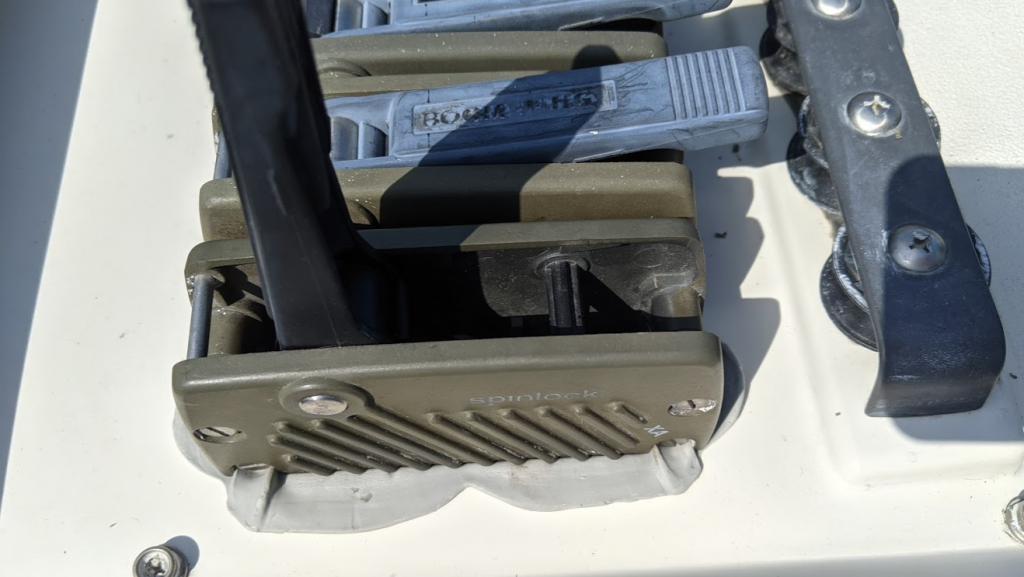
Step 2 – Take Clutch Apart
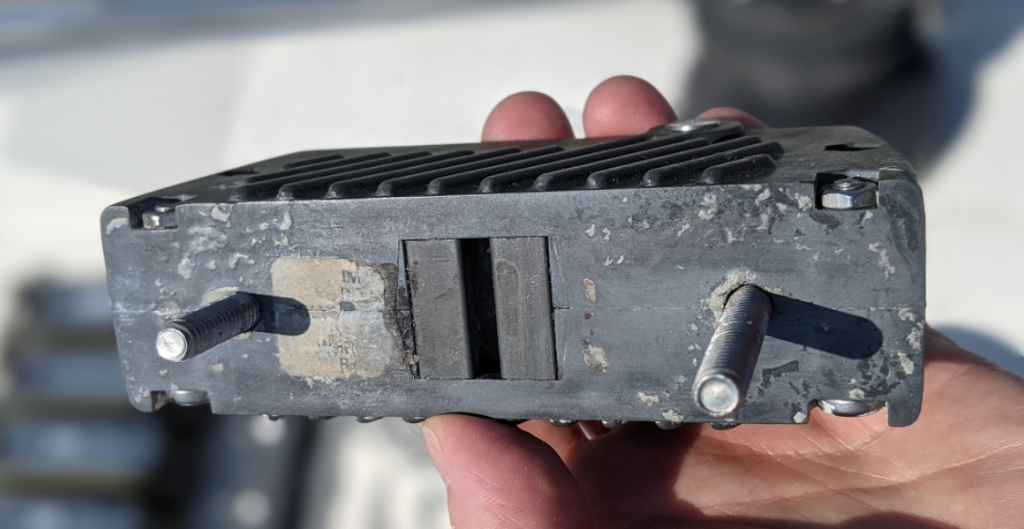
There are four bolts and one pin holding the clutch together. I don’t believe you need to take the four bolts off, but I did anyways because I didn’t know what I was doing.
The important part is removing the pin at the center of the handle.
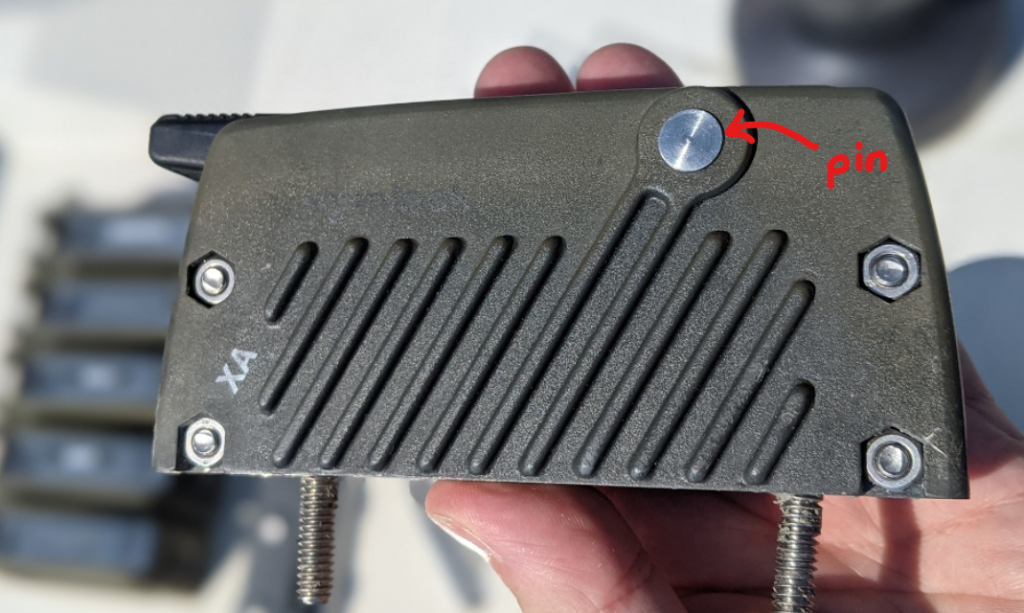
I put the clutch on top of a large roll of duct tape with the pin in the center. Then used a proper punch (OK, I didn’t I admit I used an old stubby screwdriver because I didn’t have a punch).
Gently hit with a small hammer to knock the pin out the other side. I used a little bit of penetrating spray to help loosen the pin. Make sure you thoroughly clean it afterwards, I don’t think it’s good to leave this spray on the plastic.
Lift the handle straight up. Now be careful there’s a spring arm on one side. This along with the lever handle and the cam should wiggle out.
Step 3 – Clean
Drop everything, except the parts you are replacing, into your bucket of soapy water and clean. Use a toothbrush to get into those hard to reach places. Scrub off any old sealant from bottom of clutch and from bolts.
Step 4 – Put it back together
This is a bit tricky and there are two important parts.
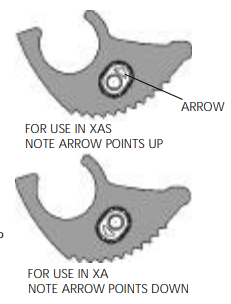
- Ensure the cam insert is correctly installed
- Springarm goes on the port side of the cam
- Install the new cam insert – the cam replacement comes with a small plastic insert that needs to be wedged into the cam. It’s a tight fit, I had to use a hammer. Make sure the arrow is pointing down (for Spinlock XA).
2. Insert the springarm into the port side of the cam. Do a quick mental workout to figure out what side is port. Took me a bit, but here’s some other ways to describe it. Look at picture above, the arm goes into the side shown. Also, position the clutch so that the pin is at the top (lever opening up away from you), the spring arm is going to be inserted into the left hand side.
3. Replace the springarm and cam into the body with long arm of the springarm inserted into pivot point on left side of the clutch body.
4. Replace handle lever by guiding into the body in the open position. Rotate to the closed position. Double check that the cam is held by lever and the springrarm (with spring) is still correctly connected to body. Instructions for springarm mentions a “blue pivot in rear molding”, I don’t recall seeing anything blue.
5. Lightly grease pivot points with silicone grease.
6. Replace pin by aligning the holes and gently tapping the pin back in place.
Note: I was using my existing sun-faded clutch lever and noticed that the silicon grease removed the white sun faded film from the lever. So I went crazy and covered the entire lever with silicone grease and then wiped it dry. You will see difference below.
Step 5 – Reinstall on deck
Thoroughly clean the deck. Lori loves her acetone for cleaning jobs like this!
Instructions mention silicone or a gasket for resealing. I like butyl tape. I cut two strips and thoroughly wrapped the base of the bolt. I went overboard, it looked like a playdoh toy as the bolts were being tightened. Fortunately butyl is really easy to clean up.
One important tip for sealing. Similar to removal, do not let the bolt rotate while you are reinstalling. Use your screwdriver to stop it from rotating. I’ve heard that allowing the bolt to rotate will tear the butyl or introduce leaks where it enters the deck.
Look at the difference in the clutch levers! I’ll provide an update later on how well this is holding up over time.
Lessons learned
- Really not that big of a deal to do. Bolts were easy to remove and replace. I’m feeling way more comfortable in doing this again in the future. Even the thought of replacing the clutches and moving the installation holes isn’t as scary anymore. Still scary, but more willing to do it now.
- Noticed some quality issues hiding behind the ceiling panel. One of the bolts holding the starboard hand rail was bent. Found a broken end of a jigsaw blade.
List of Spinlock XA Part Numbers
- XA-SIDE: High Strength XA Side Fairings (Pair)
- SA16 or XA16: XA Handle
- SA29: XAS & XA Spring Arm
- XA/1: Original XA
- XA-KIT: Base, cam, sides and handle


June 12, 2021 at 11:09 am
Hi Shane,
After 17 years with our CS27 we bout a CS30 last fall and the winter and spring has definitely been a learning experience. I’ve been a CSOA group member for many years and subscribed to your blog a month ago.
I just wanted to thank you for taking the time to post these very informative and helpful articles. We bought a well kept for boat from a meticulous original owner but your blog has pointed out many items we’ll need to look into.
And BTW, servicing the winches is definitely easier than imagined.
Derek
June 12, 2021 at 4:50 pm
Thanks Derek, appreciate the comment!
The CS30 is a nice boat. It’s interesting to see all the similarities between the various models.
Glad my articles are helping. I’m still learning and fumbling along the way so always get a second opinion!
Good to know about the winches. It’s one of my projects this weekend. I have this fear that it’s all going to spring apart on me, throwing parts all over the place!
July 8, 2021 at 7:30 am
Hi Shane,
This is a really great instruction! I am planning to upgrade my clutches based on a video on Youtube, but your instructions are even better. We have a pair of XA triple clutch on our boat. We had the slipping rope issue too with one of the positions because the spring arm (SA29) was totally missing from that position. The small rotating axle was also missing which holds the arm in place. It was tricky to get this item, because the supplier in Hungary had two old sets in stock but that sets did not contain the small plastic axles yet. The new type of set from Spinlock includes this. So we had to wait several weeks to get in hands this important part thanks to Brexit… But finally this week I got it.
I have two questions. If I have to the original cam (CAM-XAS) in good condition does it have the small insert in it? If yes I am afraid it is not inside and I should order a replacement. If the original design was different and it was made from one part I could avoid to reorder it too. Unfortunately I cannot tell without disassembling it so this info could help a lot.
My other question is how the silicone grease is keeping the nice look of the handle? Do you think it can keep this nice dark homogenous color for a full season or even longer based on the several weeks passed? If yes, I would give a try too.
Thanks in advance!
András
July 8, 2021 at 9:48 am
Hi András,
Thanks for the comment!
Yes the original cams had these inserts but they may be difficult to remove. Keep in mind our set is XA1, not XAS, so it may be different. I had to tap the plastic insert in with a hammer.
The silicone grease looked great for about two weeks. They may still be slightly better than before but they’ve gone back to their faded grey colour.
Let me know how your project goes!
July 8, 2021 at 9:51 am
One more quick comment. If you need to replace that many components you may be getting close to the same price in parts as buying a whole new clutch.
I’m guessing shipping and import fees will be crazy but a few options for online ordering are:
Defender.com in the USA
Marine Outfitters.ca in Canada
Binnacle.ca in Canada
July 8, 2021 at 10:51 am
Thanks for the answers!
I will take a look on this insert when I disassemble them. I hope it is not lost.
The hungarian supplier has reasonable pricing, only this Brexit thing caused big and unpredictable delays into the reordering process. I was even surpised about this replacement parts are still available to buy, I thought this items are discontinued long time ago. I was missing only this spring arm and one of the sides was broken, so I decided to replace the sides on both clutches to visually match. The spring arm set was around 15$, the two pairs of sides (XA-SIDE) were around 30$ / set. With this budget I am still way below of buying two brand new clutches and they are working fine so there is no point to replace them. Save Earth, penguins and polar bears etc…
June 7, 2024 at 9:16 am
I need the repair kit for Spinlock XA 1/4 to 1/2. Got any?