Ever since I was old enough to hold a screwdriver I loved to take things apart. It was the next step of putting it all back together that I sometimes failed at. I was successful in taking our CS34 boom apart. Now I needed to figure out how to put it back together.
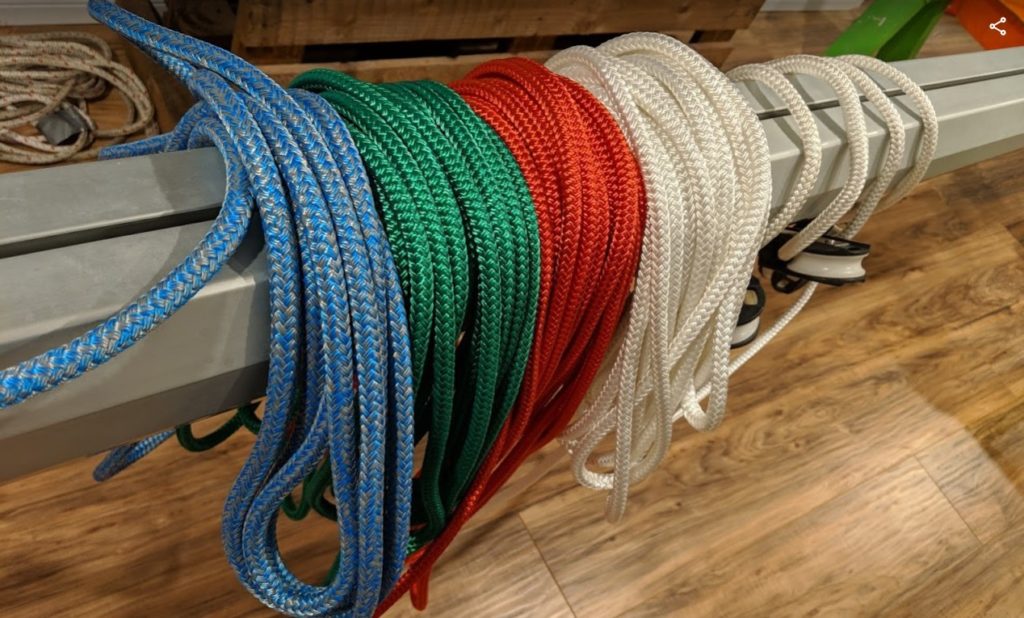
We had all the parts we needed to put the boom back together
- two lines for first reef
- two lines for second reef
- two shuttle cars (one brand new from Holland Marine)
- five stainless steel bolts and nuts
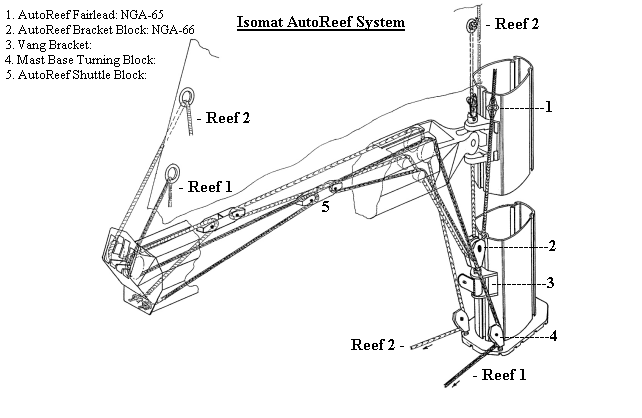
Now I had to go back to this diagram to try and figure out how the lines were fed through the boom.
A few other notes from other documentation found:
To adjust the length of the aft reefing lines, raise mainsail to highest position, leave forward reefing line free and pull the aft line at the stopper knot aft. This will move the shuttle block inside the boom aft. When the shuttle block is about an inch or so from the outboard end of the boom, tie the stopper knot and cut off any extra line.
Also take note #1, the line going up to the lowest reefing point on sail needs to through the fairlead on mast. I didn’t realize this, not sure how it makes a difference yet.
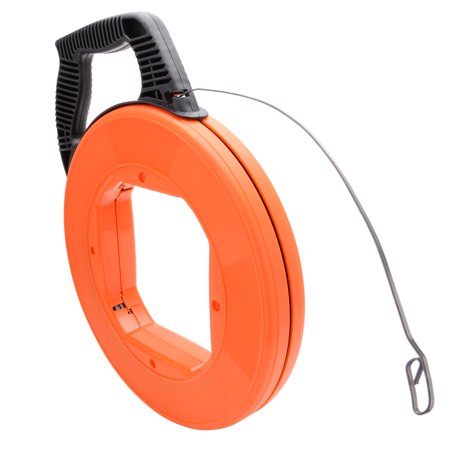
If you are going to do this, I suggest you go out right now and buy yourself a 50′ electricians fish tape. This simple little tool saved us a lot of time and I think we’ll find a lot more uses for it on our boat. The wire has just enough strength that you can push it through the boom to feed the lines through. Before we pulled this out we were trying to use a pole and were failing miserably.
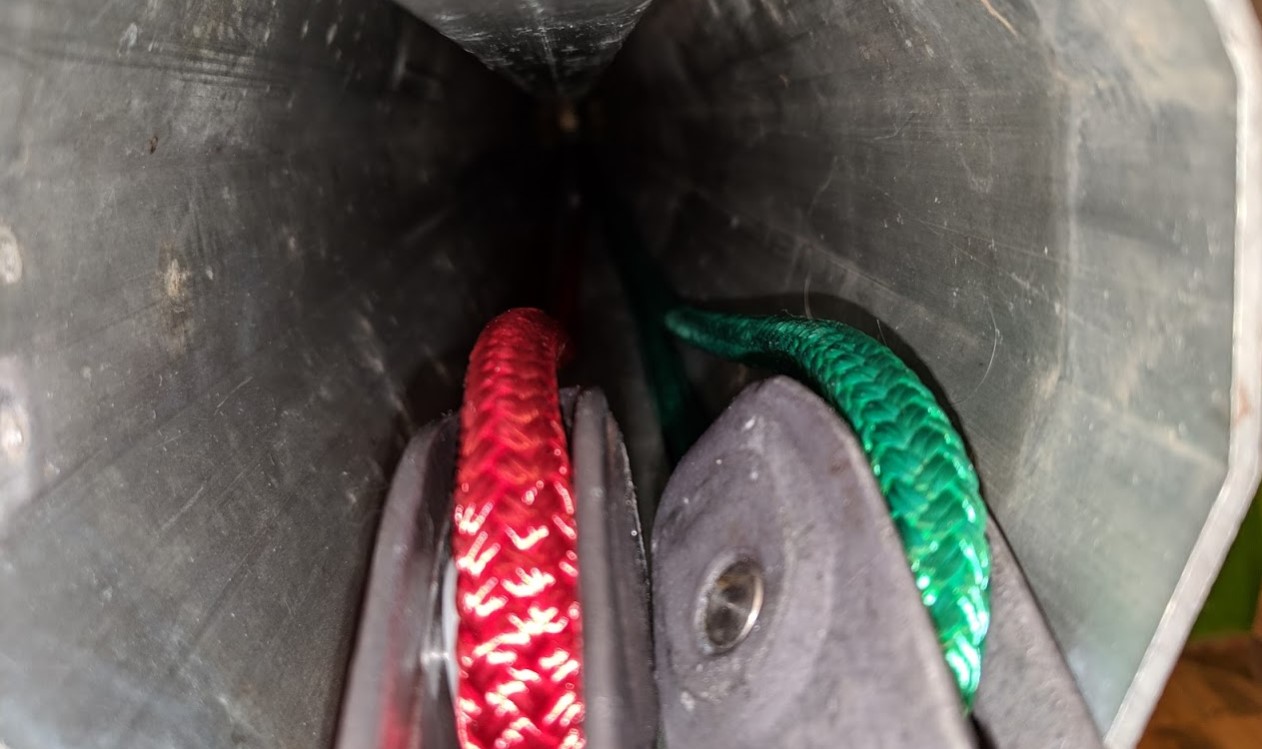
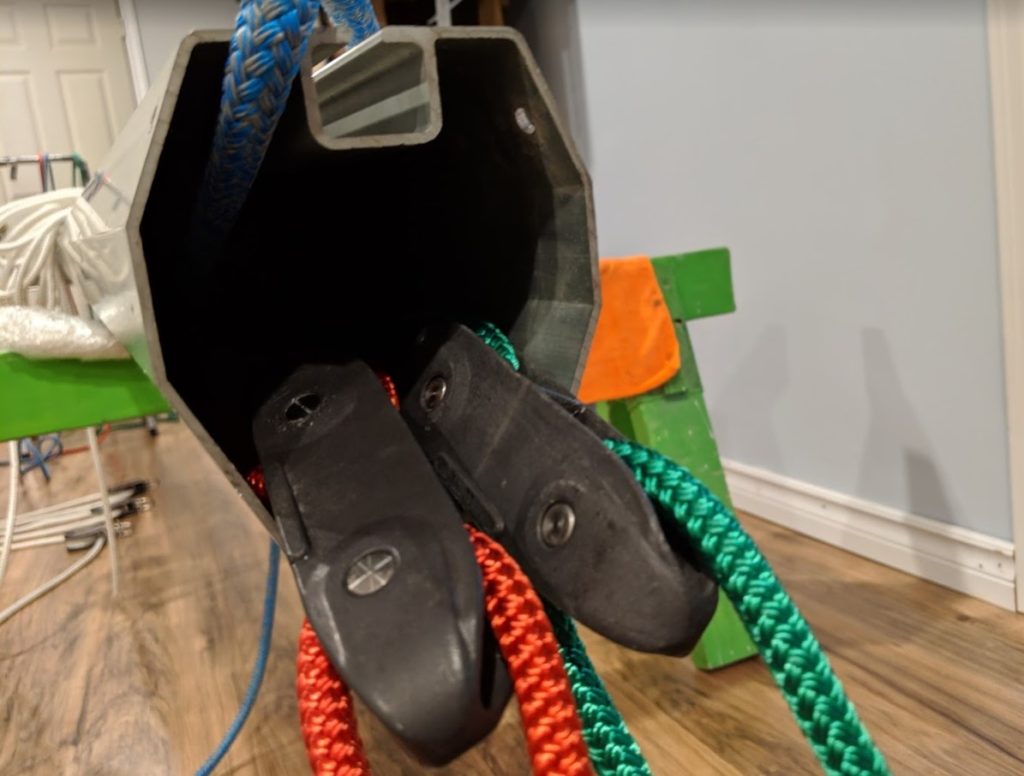
Getting the lines through the AutoReef shuttle blocks were easy, I did struggle a bit trying to figure out how to get the lines around the pulleys. But eventually, almost, figured it out.
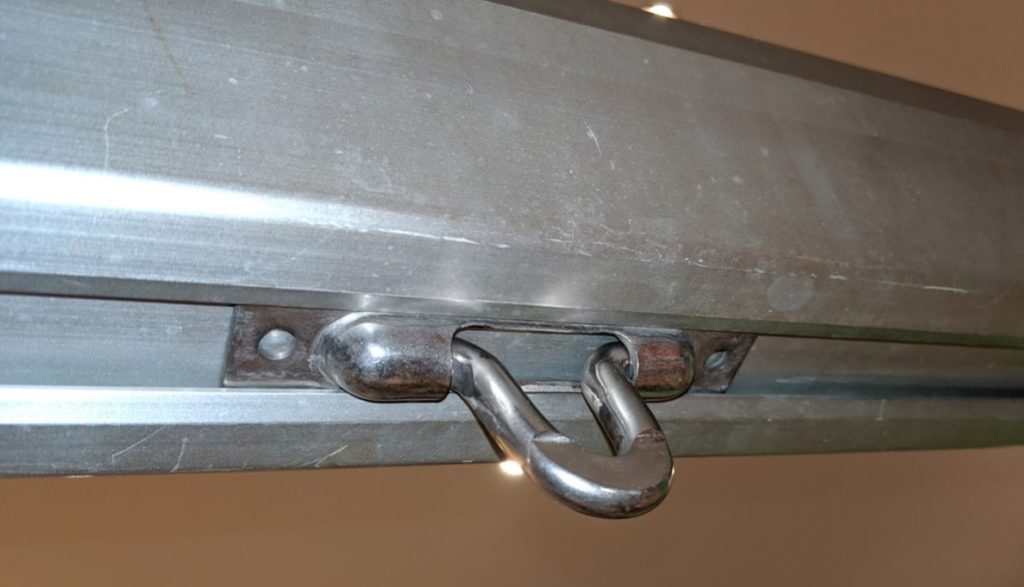
We decided to use nuts and bolts instead of rivets, I think it is the wiser plan and will allow us easier access in the future. But trying to get a wrench through the end to hold onto the nut inside the boom was very tricky. We found the best tool for this wasn’t an open ended wrench but a small ratchet wrench.
Finally after at least 30 minutes struggling to get the five bolts on we were successful. We sat back and proudly looked upon our finished project.
Lessons learned
At this point I hear the dreaded words that nobody wants to hear after finishing a project. Lori looks at me and says, “what is this piece for?”. She’s holding in her hand the attachment point for our reefing line.
This little piece can slide back and forth and when I had the boom taken apart I took it outside to clean. And I decided to be “smart” and slid these off so that I wouldn’t lose them while cleaning. I have no idea how I managed to re-attach only one of them. The second was sitting on the table next to us, watching and I’m sure chuckling to itself, while we struggled putting the end cap on the boom.
We removed the end cap, slid this piece back into its proper place and then re-attached the end cap, again. We were much faster the second time, I think it only took us 20 mins.
Direction of reefing lines
The second issue with my work was discovered later. On one side of the boom the lines are stopped with a figure eight at the bottom. On the other side all of the lines run out through pulleys. I had run reefing lines to cockpit down and reefing lines to sail up. I completely forgot that there are two blocks on the deck to put the reefing lines closer to the mast. All of the reefing lines needed to run down. We were, fortunately, able to wiggle the lines through the end of the boom without having to take it apart again.


June 13, 2019 at 11:41 am
Thanks for posting.
I was fighting with my #2 reefing line last week, thought I was going to look up your post on the boom over haul but I managed to free the shuttle, fortunately without taking it apart
June 13, 2019 at 3:27 pm
I was surprised that everything didn’t have its own track in the boom. I can see how they could sometimes get into a snarl inside there.
September 3, 2019 at 10:00 pm
Hi all, Im about to take my boom apart and clean out the birds nest grass and feathers it looks just like yours inside. I now tape over the open end of the boom to keep the birds out.. I like your solution for refastening the ends with bolts instead of pop rivets. If the casting looks thick enough I was thinking of taping the casting and using a bit thicker bolt. I do however have a compound jaw pop rivet tool that will handle 1/4 inch rivets. My boom does not have the reef shuttles like yours. The end of the outhaul line is somewhere inside the boom but you can’t get at it with the ends in place. So I’ll be drilling out the rivets this week….oh boy cant wait……Thanks for the posting……..Rich P Ventura california
September 8, 2019 at 9:34 am
Hi Richard,
thanks for the comment. I’m not sure why these booms were riveted shut when they need maintenance. The stainless rivets are a pain to remove. I like the idea of tapping and threading new bolts right into the boom. It will be a lot simpler and less wrench yoga will be required to attach. Just a bit worried of them wiggling their way out.
Let me know how it goes!
Shane
April 2, 2020 at 10:42 am
Did ours on Wavelength 10 years ago. So far so good.
August 4, 2021 at 4:05 pm
I have been searching endlessly for a source of the “Isomat Shuttle Cars.”
Your article is the most complete I have seen for rebuilding the system on my Pearson 31-2. I tried a pair of Harken double-ended blocks this season, but managed to destroy one of them in one shakedown cruise. Where in the world can one convince a company to sell me a pair of these, maybe three, as I will probably need a spare eventually…
August 4, 2021 at 6:22 pm
Hi George,
thanks for the compliment. I love to document things!
The Isomat Shuttle Cars are somewhat difficult to find. I guess that’s why we had two blocks duct taped together as a temporary solution in ours. You can see it in my other post:
https://www.foghornlullaby.com/2019/04/isomat-boom-maintenance-taking-it-apart/
I ended up purchasing a new shuttle through Holland Marine here in Ontario:
http://www.hollandmarine.com/
I’ve heard Rig Rite may also have them.
https://www.rigrite.com/
September 10, 2021 at 2:44 pm
Well, Shane, thanks for the input. Since my last post, I acquired a pair of these:
https://engrope.com/shop/climbing-gear/climbing-saddles-accessories/low-friction-rings/.
…albeit from West Marine. After the boom work I did last winter, the replacement of my previous failure took only a Sunday boat yoga session, and the result is great! My 1988 Pearson 31-2 now has a great pair of single-line reef points that probably aren’t much more difficult to cinch down than the original design.
September 10, 2021 at 4:32 pm
Hi George, that’s great. I think those low friction rings are a perfect alternative to the expensive shuttles. Glad they are working for you!
February 23, 2022 at 1:31 pm
Hi Shane. Thanks for the post! I’ve been considering tackling this myself as the reefing system was completely abandoned by a previous owner. Do you happen to have any pics of how you ran the lines at the mast? Also, did you just put a stopper knot after the rear lines run through the sliding attachment point?
Thanks again for the post. It’s hard to find anything on these setups besides the little diagram in the manual.
February 23, 2022 at 4:48 pm
Thanks for the comment Todd, you will appreciate being able to reef easier after running the lines again!
Yes, put a stopper knot so the lines don’t feed back into the boom. I had these on all the lines but for some reason last fall while we were removing all the lines from the mast I undid one of these stopper knots and then proceeded to pull the other side of the lines. Typical mistake on my part, I was trying to clean up all the lines as quick as I could and got a bit carried away. Looks like I’m going to be taking our boom apart again this spring to get the line back in!
I do have some pictures of how the lines run. I’ve changed things up a bit over the years and happy with the setup now.
I’ve documented how I’ve rigged the lines here:
https://www.foghornlullaby.com/about/cs34-sailboat/cs34-running-rigging
Many people run the genoa furling line along the deck rail. I’ve found I prefer this setup better, but it does create a tripping hazard above the bow hatch. We’ve gotten used to it being there.
March 11, 2022 at 1:59 am
Hello from Denmark
I am rebuilding my Isomat boom with the single Line reefing system…I have been thinking….Am I correct, that the reef point can’t be higher up than half the boom length or you run out of travel in the boom?…the shuttleblocks can be bought here https://www.sea-sure.co.uk/2960-double-ended-block-768-p.asp
March 13, 2022 at 3:00 pm
Hello Soren, Denmark is one of my favourite places! Been to Billund and was fortunate to know someone to provide a tour of the Lego factory there!
That’s a great question, I’m not confident of my answer but I’m thinking if the rope goes from one end, to the block and then back to the same end you may have up to 2x the boom length. We have to pull out our boom in the spring and re-run one of the reefing lines. I will take a closer look and give you a more correct answer then!
March 22, 2023 at 12:12 pm
Hello again Shane
How did this end up? Were you able to get the reefing system to work?
March 22, 2023 at 3:01 pm
Good reminder Soren. I ended up not having to take it apart and was able to re-feed my longer line into the boom. I sewed and taped the end of the longer line to the end of the shorter line and fed it through.
System is working well. We have a new method of not pulling in the reefing lines completely when we drop the sail. We let the reefing lines collect in the main’s stack pack. This makes raising the sail much easier as the lines are loose when we raise the main. Before I would lessen the resistance on our main halyard by pulling the reefing lines out of the end of the boom as we raised the main.